
 My Account
If you’re looking to renovate a bathroom – an updated mirror can make a big difference. But how do you remove a bathroom mirror from a wall before swapping in a new one? It’s likely easier than you think!
Find out how to safely remove a mirror from a wall if you have clips or brackets holding it in place. The whole process can take a few minutes and requires only a handful of tools you likely already have in your home.
Don’t see any clips holding your mirror? In that case, your mirror is likely glued onto the wall. This is going to require a different technique that we won’t go over in this article. (But this video from Next Level Carpentry might help you out.)
If you’d also like to watch this project, check out this 2-minute video below.👇
Tools:
- Duct tape or carpet protector
- Putty Knife
- Gloves
- Goggles/Glasses
- Hammer
DISCLAIMER: This blog contains affiliate links, which means that if you click on one of the product links, I’ll receive a small commission.
How to remove a bathroom wall mirror in 2 steps -DIY
Step 1: Cover the Mirror with Carpet Protector or Duct Tape
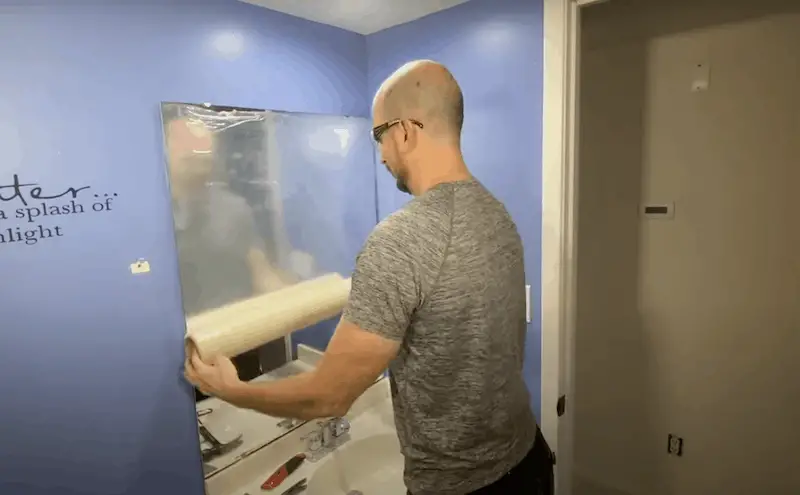
Before you start removing anything, be sure to protect yourself by covering the mirror. I used two runs of carpet protector that I had laying around from other DIY projects. But if you don’t have this, you can also make a criss-cross pattern with duct tape to get good coverage on the mirror. The whole point of this step is to avoid shards of glass falling all over if a part of the mirror breaks off.
Pro tip: Mirrors are often a lot heavier than they appear! So keep that in mind as you proceed to the next steps.
Step 2: Use the Putty Knife to Remove the Clips/Brackets
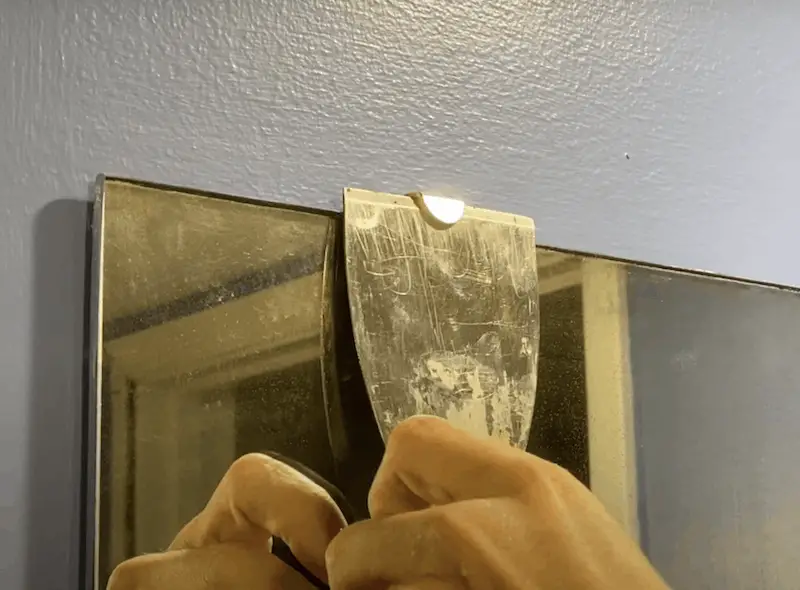
With gloves on, put the putty knife under the bracket and gently tap the clip with your hammer until the clip is above the mirror. You shouldn’t need too much force. Repeat with the other top clip(s). Then, use the putty knife for a little leverage to pop the mirror out.
The brackets on the bottom stay in place. You’ll then slide the mirror to the left or right and remove it from the wall. That’s it!
(Go to minute @01:40 in the above video to see a closer look at the clips, so you can see the part that’s actually screwed to the wall and the sliding part that secures the mirror.)
Final Notes on Removing the Mirror + Clean Up
Hopefully, your mirror comes off easily with minimal force, but each project is going to be a little different. If you have a hard time removing the mirror, you might also have some double-sided tape or something holding it in place. I recommend using your putty knife and applying pressure across the mirror to get it off the wall. Go slowly and be patient.
Finally, if any shards of the mirror do fall off, be sure to clean them up with a vacuum or other tool. Here are other easy hacks for cleaning up broken glass. Keep in mind that glass travels far, so look around more than you probably think!
The Wrap Up
Whether you’re doing a bathroom makeover or simply swapping in a new mirror – removing a bathroom wall mirror is a fairly easy DIY project. The most important thing is to go slow and steady. If you’re dealing with a heavy mirror, it’s not a bad idea to ask a friend to help spot you. And be sure to protect yourself with proper footwear, goggles/glasses, and gloves.


