
 My Account
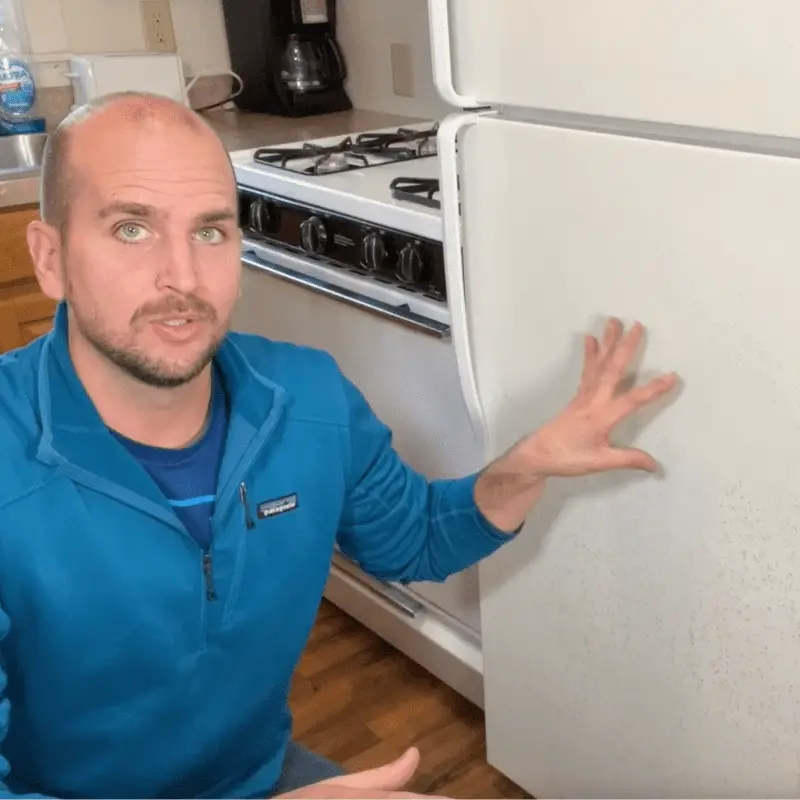
Got an old appliance that works fine but is suffering from exterior rust or corrosion?
In this guide, we’ll talk about how to paint a rusted appliance. In this case, it’s the rusty doors of a refrigerator. This simple DIY painting project can be completed in a day for a cost of around $40.
This is one of those home repairs you can easily do yourself. Best of all, it will save you hundreds of dollars and render amazing results.
Our subject for this home repair how-to is a refrigerator in an Airbnb that I own. It’s the first thing that meets guests as they come into the unit, but the rust spots that have started to form on the exterior of the refrigerator door and, to a lesser degree, on the outside of the freezer door are not making such a good first impression.
Painting Rusty Refrigerator Doors: Step by Step Guide
This is not a surface issue on top of the paint that could just be scrubbed off, it’s actually corrosion coming from the metal underneath. So my plan is to treat these rusted refrigerator doors using a rust reformer, a product that chemically converts the rust into a stable polymeric coating that will act as a primer, and then paint the fridge doors.
The process is a pretty simple series of steps that any do-it-yourselfer can feel confident about:
- Remove the fridge doors.
- Prep the rusted surfaces with rust reformer (also called rust converter).
- Paint the fridge doors with epoxy appliance paint.
- Let the paint dry well and reinstall the doors.
This easy home repair procedure should solve the rust problem and make this appliance look like new.
Rather watch than read? Check out this 9-minute video.
DISCLAIMER: This video and description contain affiliate links, which means that if you click on one of the product links, I’ll receive a small commission.
How to Paint a Rusted Appliance: Supplies
- Krud Kutter
- Scrub Songe
- Blue Painter’s Tape
- Sanding Sponge (320 Grit)
- Tack Cloth
- Tape with Attached Plastic
- Rust-Oleum Paint Reformer
- Rust-Oleum Appliance Epoxy
Removing The Refrigerator Doors
So let’s jump into it! First, let’s remove the doors from the refrigerator.
Freezer door:

- Unfasten the 3 screws from the top bracket.
- Pull off the bracket.
- Gently lift the freezer door off the bottom freezer bracket.
Refrigerator door:

On the top bracket of the refrigerator door (which is, in effect, a central bracket that also serves as the freezer door’s bottom bracket):
- Remove the inside screw with a screwdriver.
- Loosen up the outside screw with a wrench.
- Carefully pull the door away just slightly and detach the bracket.
- Remove the refrigerator door.
Paint Prep
Now, out in the garage, I’ve laid the doors flat on some sawhorses. The prep involves 4 simple steps:
1. Remove the hardware I don’t want to be painted:
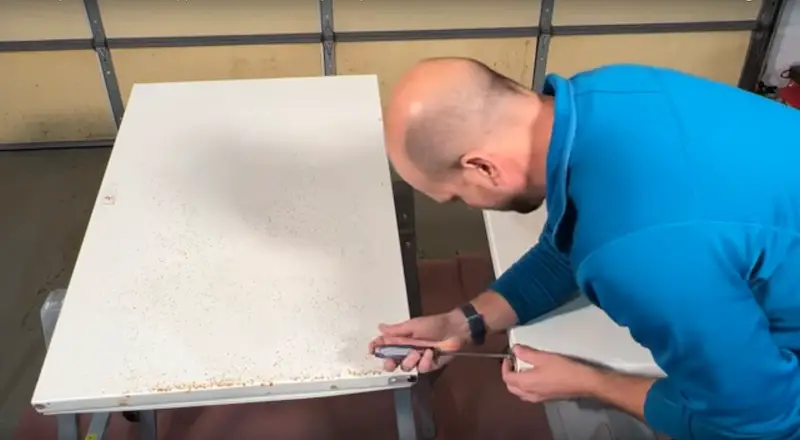
- Handles on both doors
- Bracket on bottom of freezer door
- Bracket on top of refrigerator door
2. Use Krud Kutter to degrease the doors.
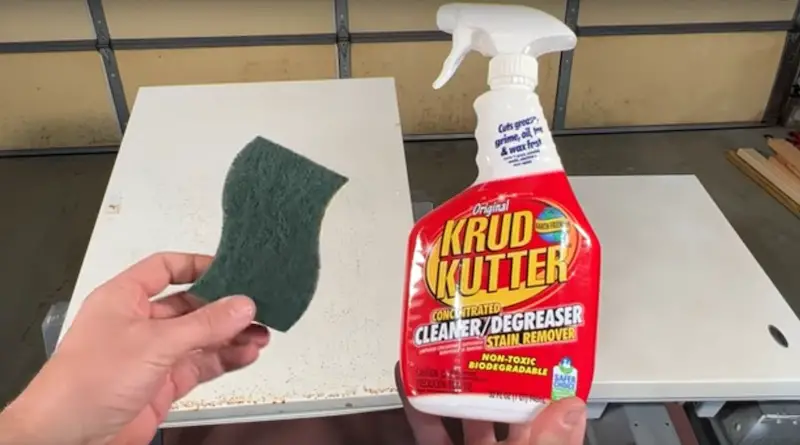
This is important before going on to the next step of the prep.
- Using a scrubbing sponge, do a thorough cleaning with the Krud Kutter.
- Wipe off excess with a paper towel.
3. Lightly sand the fridge doors
I’m using a 320 grit sanding block to lightly sand both of these doors.

- Using short, light strokes with the sanding block, give the doors a good going over to loosen up any debris, especially where the rust is worst.
- Wipe away all debris with a tack cloth.
4. Mask off areas not to be painted

This is the last step of the prep. I’m going to mask off some things I don’t want painted using some blue painter’s tape and a sharp utility knife to cut out exactly the shape I need.
- Press the tape onto the object to be masked.
- Take your time and very lightly trace your utility knife on the outside of the object (in this case, some screws and the Amana nameplate) to just get the outline that you need.
To mask off the inside of the door, the seal, and the sawhorse, I’m going to use blue painter’s tape with plastic attached. This product saves a ton of time. I’m a huge fan of it for this type of project but also for painting around the house. See the Supplies section for the exact product and link.
Prep is done! Here’s how it looks:

Covering Rust With Rust-Oleum Rust Reformer
I’m using Rust-Oleum’s Rust Reformer here, which is good for most jobs. If you have a badly rusted-out door I’d probably use a product called POR 15. It will cost quite a bit more but it is the best on the market.
Rust Reformer Application:
Apply the rust reformer to the refrigerator door in light strokes to avoid streaks. (In the video you can see this is in real-time at the 4:52 mark.)
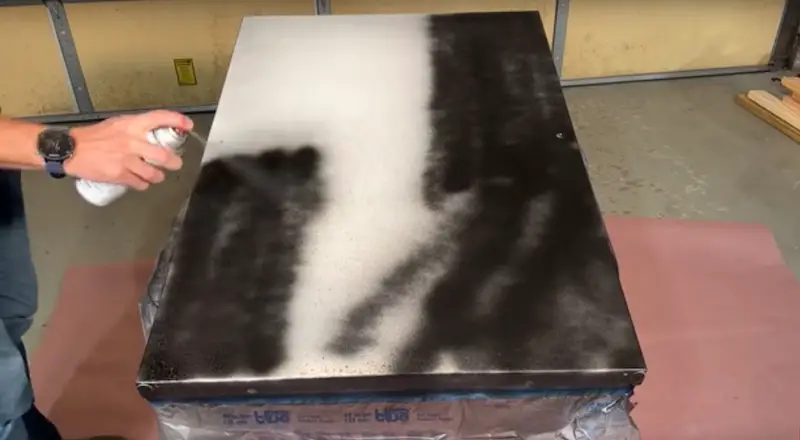
I’ll apply two light coats to the refrigerator door prior to moving on to painting. The freezer door isn’t too badly corroded so I’m not going to use the rust converter on it.
That does it for the rust converter part of the project. Now we’re ready to lay down some white paint.
Painting with Rust-Oleum Appliance Epoxy
I’m planning on 3 or 4 coats of appliance epoxy on the refrigerator door to thoroughly cover the black finish of the rust converter, and 2 coats on the freezer door because I did not use any rust converter there.

A few notes about applying epoxy appliance spray paint:
- Make sure you’re in a well-ventilated area. (In the video you’ll see the garage door is closed but there is an eight-foot door open off to the side that’s helping clear out all the fumes.)
- Go light on each coat to avoid streaking.
- Let each coat dry thoroughly. I left about an hour between each coat. It was about 50 F outside so I set up two heaters to help with the drying time.
Once all coats of appliance epoxy have been applied I’ll let it dry for about 4 hours.
Reinstalling Doors and Final Product

All that’s left now in our “how to paint rusted refrigerator doors” project is reattaching the hardware and reinstalling the door.
- Reinstall handles and brackets.
- Set lower door in place, reattach central bracket.
- Set upper door in place, reattach top bracket.
That’s it!
Here’s our finished “How To Paint a Rusted Appliance” product:

I couldn’t have imagined these doors turning out better than they did. The rust reformer product worked amazingly well and the fridge looks brand new.
Feel free to let me know what you think or what you did differently! You can leave your comments on YouTube.
How to Paint a Rusted Appliance: Recap of Time and Cost
This simple DIY home repair project of painting an old rusted appliance is going to take you about a day, but a lot of it is drying time between coats of paint.
Total cost is about $40, by the time you get all the supplies. A full list with links can be found in the Supplies section.
How These DIY Repairs Hold Up Over Time
You might be wondering, “How did this repair job hold up? Did the rust come back?
To see how our do-it-yourself home repairs hold up over time, scroll down to the bottom of any blog articles. As time passes, we’ll post updates.
See More Home Repair Projects
Check out this great DIY hack on How to Waterproof Cabinets & Avoid Water Leaks.


