
 My Account
Before you chuck that piece of Ikea furniture in the garbage, give me a few minutes! Today’s article addresses the frustrating problem of furniture you’re trying to assemble not holding together due to damaged cam screw holes. We’ll also cover how to fix assembled Ikea (or similar) furniture that’s been similarly damaged through use.
If you’ve ever assembled a piece of furniture from Ikea, Wayfair, or Amazon, you’ve probably run into a common piece of hardware used to hold two flat pieces of stock together at a 90-degree angle: the cam screw and nut. With a simple 180-degree rotation of the nut, you can quickly lock pieces together and easily start mounting your flat-packed piece of furniture.
While cam nuts and screws are convenient, there is a shortcoming. This evidences itself when you start to tighten things down. The screw strips out and you can’t get it fully secure in the pre-drilled hole.
This is a very common problem. Why is that?
The reason cam screws will strip out during the assembly of your Ikea-or-similar furniture is that most of the components are made from either MDF or particle board.
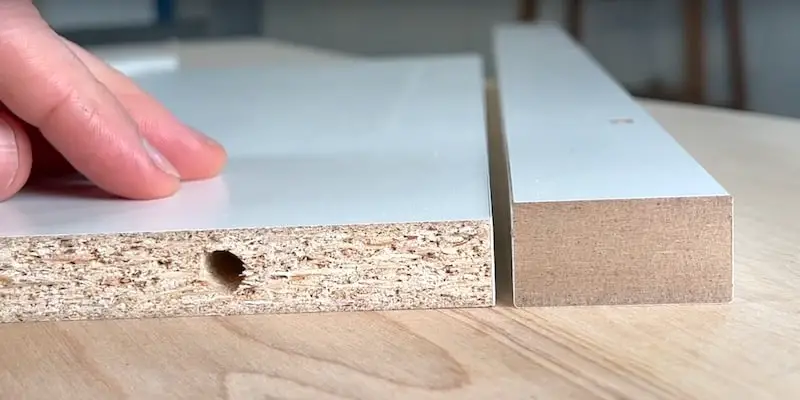
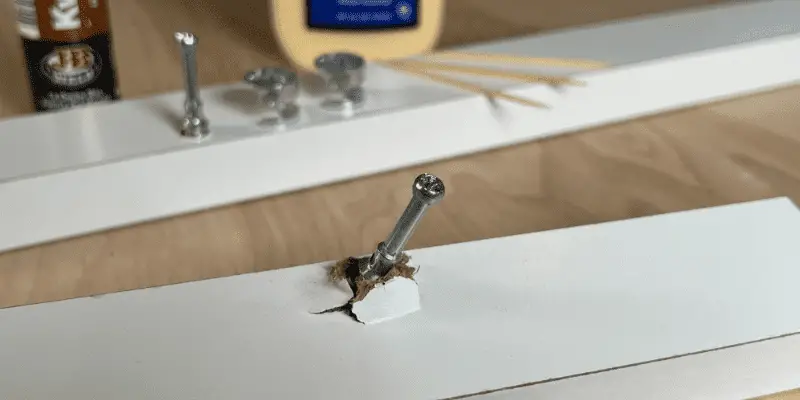
Being composite material, MDF and particle board are not very forgiving when it comes to mounting screws. Over-tightening a cam screw can even lead to a complete blow-out such as this:
Fortunately, this sort of damage to Ikea or other assemble-it-yourself furniture is fixable by any DIYer and it doesn’t take a lot of time or effort.
How to Fix Damaged Ikea Furniture: Step-by-Step Guide
In this step-by-step guide, I’ll show you three different solutions to restore the integrity of the MDF or particle board so that it will securely hold a cam screw.
We’ll start with the simplest problem to fix and progress up the full blowout referenced above.
Even if your composite components have a lot of damage, it is possible to reestablish the structure so that a cam screw will actually seat and stay put.
All you need for this easy do-it-yourself project is a couple of tools and a little patience.
So let’s jump into it!
Rather watch than read? Check out this 17-minute video.
DISCLAIMER: This video and description contain affiliate links, which means that if you click on one of the product links, I’ll receive a small commission.
How to Fix Damaged Ikea Furniture: Supplies and Tools
Supplies
Tools
How to Fix Damaged Ikea Furniture Fix # 1: Adding Material to a Stripped-Out Hole
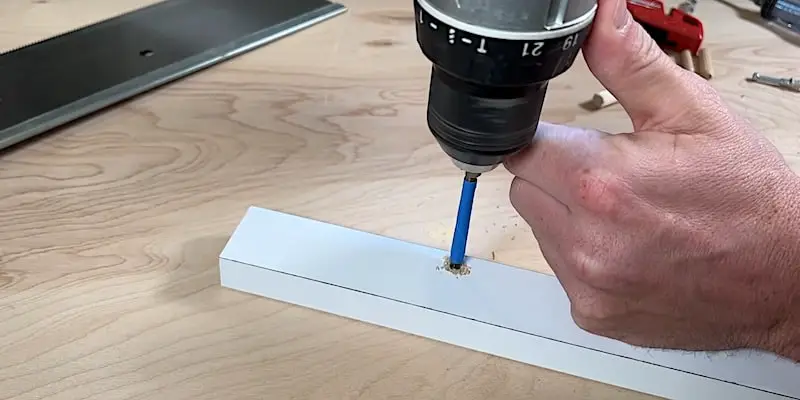
The first problem we’ll tackle is the pretty simple matter of a stripped-out hole. In this instance, the hole is in pretty good shape; I just can’t tighten down the screw.
The solution here is to add a little more material to the hole to give the screw something to grip onto. This fix will actually hold the cam screw long-term and won’t impact the durability of the piece of furniture.
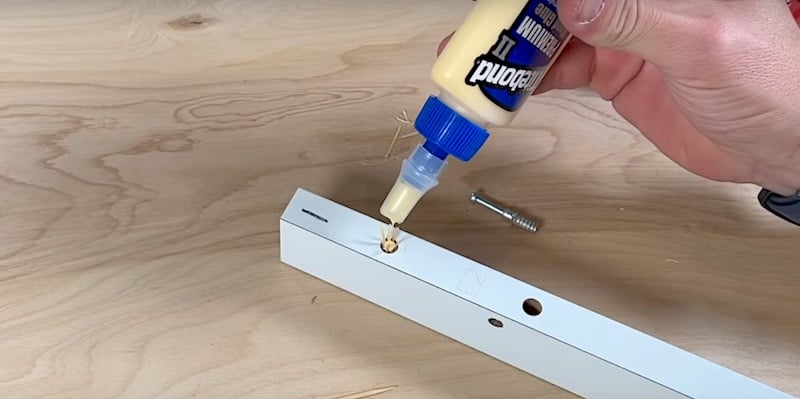
Step 1: Clean Out the Hole
To clean out the hole, just blow some air into it to remove any debris. (The air that comes out of your lungs is fine for this.) You just don’t want to have any sawdust hanging out in there.
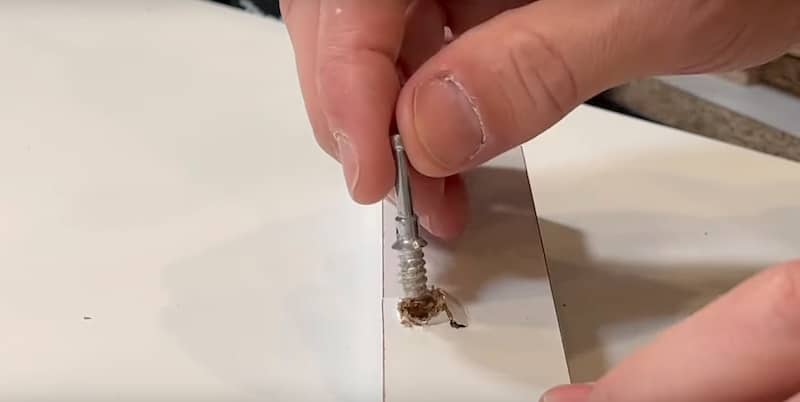
Step 2: Add Some Wood Slivers to the Hole
What we’re going to do here is similar to a trick you might have seen to fix hinges or the strike plate on a door, where you insert toothpicks, snap them off flush, and then remount your screw. Cam screws are a bit different from standard wood screws so this toothpick-fix isn’t going to cut it.
We will use toothpicks, however, to create some wood shavings. Any scrap piece of wood will work for this as well but toothpicks are convenient because you’ll get nice slim slivers. I’ll just take a utility knife and shave off some shards.
These slivers might not seem like much but you really don’t need much!
All we’re going to do is line the perimeter of the hole with the toothpick slivers. If the slivers are curved, place them curling away from the hole to allow the cam screw to seat.
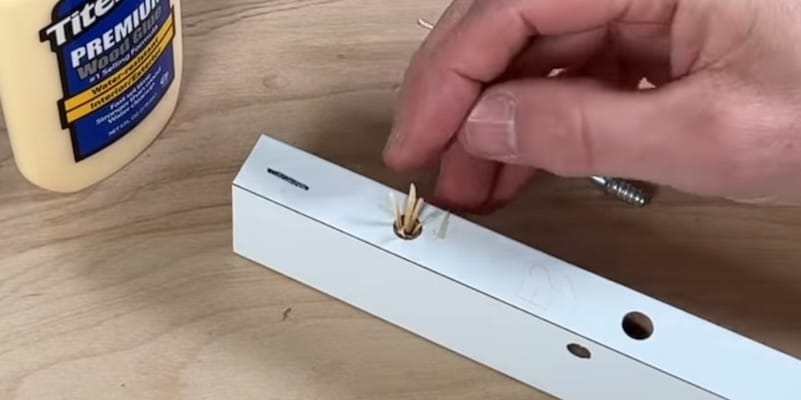
Once the slivers are in place, add some regular wood glue, just a couple of drops.
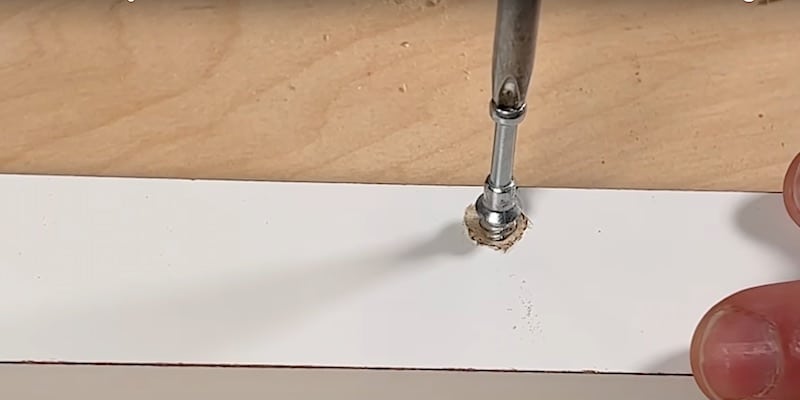
Now that we have our slivers and wood glue in place, we’ll reintroduce the cam screw. Start threading it by hand, then use a Phillips-head screwdriver to gently secure it. Most of the wood glue should push down into the hole but if some of it comes out, no problem; we’ll clean it up later.
I want to get the cam screw flush with the surface but I don’t want to over-tighten.
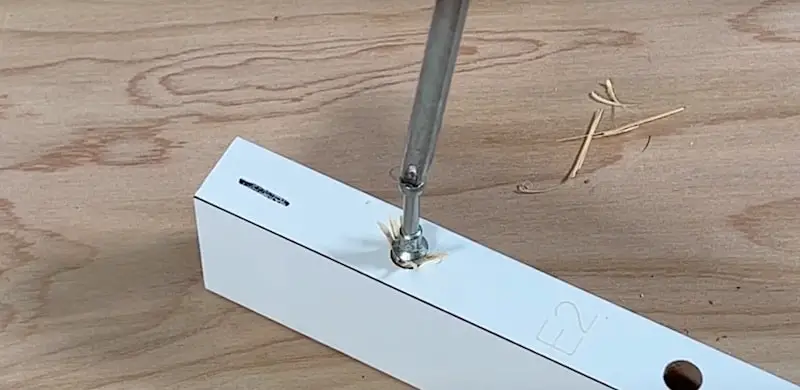
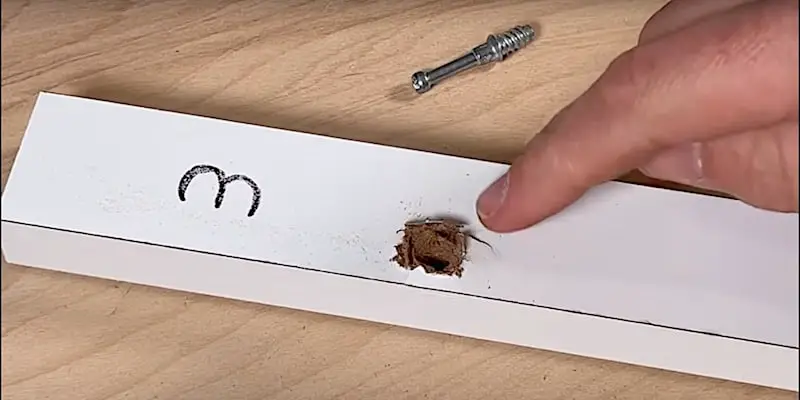
Already I have a much better hold than before but the final hold will come in 24 hours when the wood glue completely sets. At that point, the cam screw will be firmly secured and this hardware will have the strength needed to do its job of holding the furniture together over time and use.
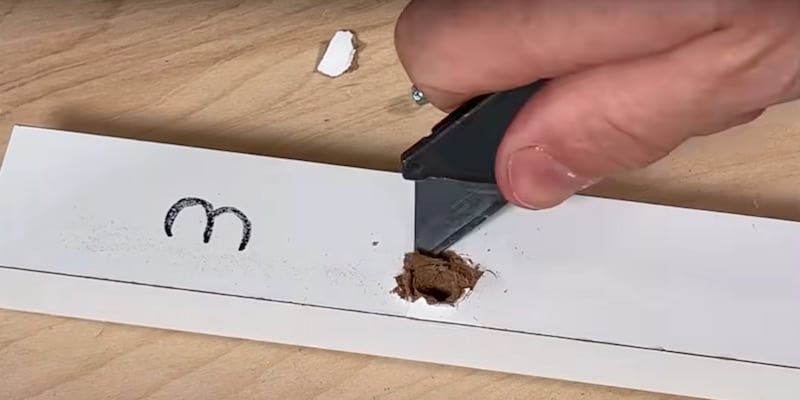
To finish this repair, I’ll trim off the protruding slivers with my utility knife and wipe off any excess glue before letting it sit for 24 hours.
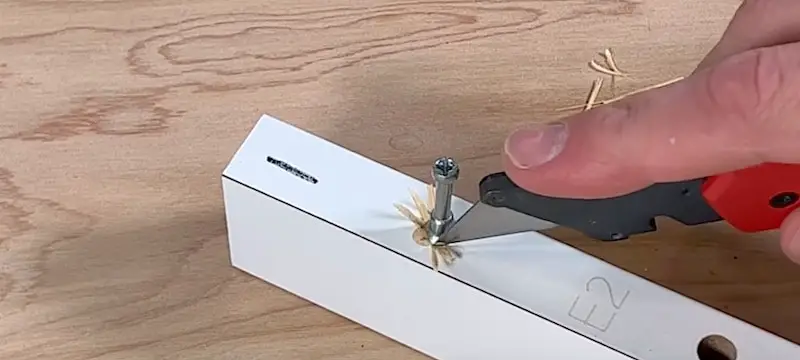
Letting the glue completely dry is important; don’t skip that step as it will render this repair much more solid and long-lasting.
How to Fix Damaged Ikea Furniture Fix # 2: Creating a New Seat for the Cam Screw with a Dowel
Now we’re working with more severe damage to our Ikea furniture. In this case, the cam screw is not grabbing onto any of the MDF; it basically will pull right out of the hole.
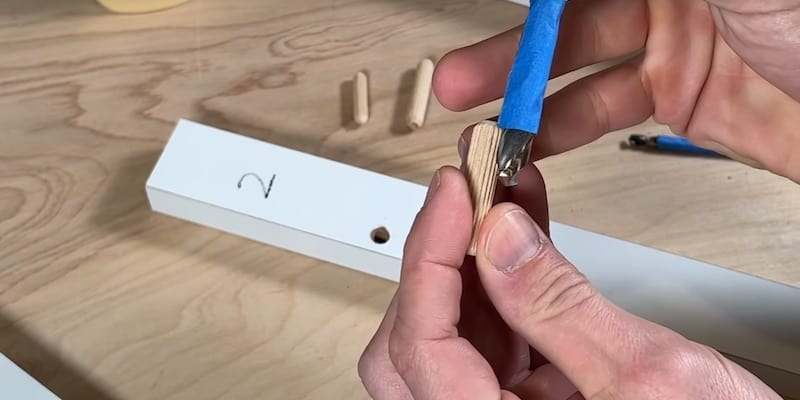
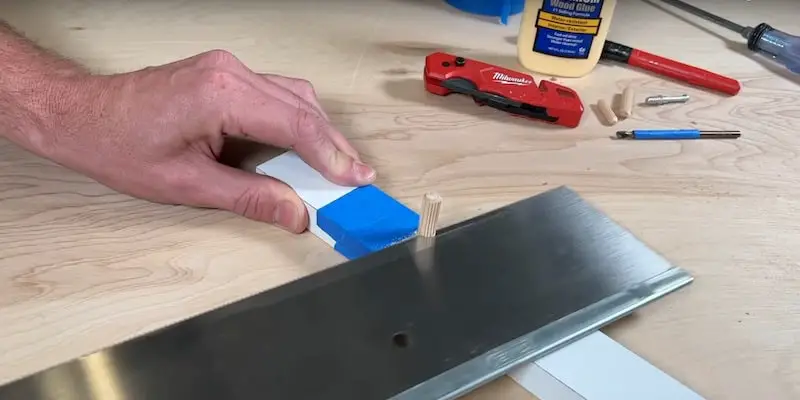
I’m going to use dowel rods for this repair. Dowels come in varying sizes and you can get them at any home improvement center.
Step 1: Choosing the Right Size Dowel Rod
I want to choose a dowel rod that’s larger in diameter than my cam screw so that I’ll have enough material for the screw to grab onto.
What I’ll essentially be doing here is creating a whole new place for the screw to seat.
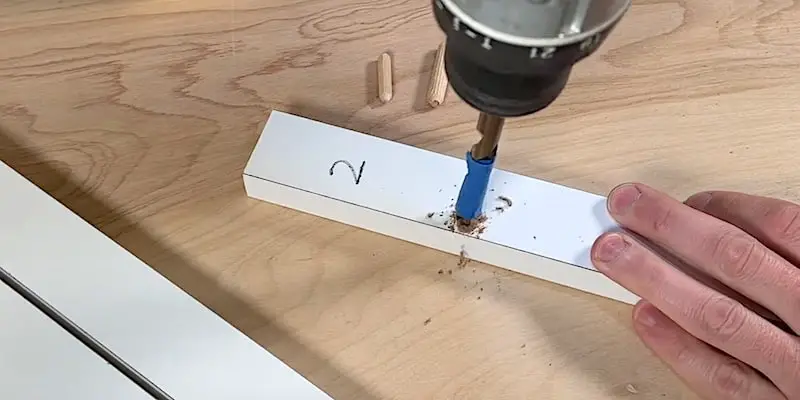
Step 2: Drilling Out the Hole for the Dowel
Now I’m going to widen the original pre-drilled hole in the piece of furniture so that it will hold the dowel and then drill a pilot hole for my cam screw in the dowel. I’ll need two different drill bits for this.
To widen the pre-drilled hole so that it will accommodate the dowel, I’ll need a drill bit of the same diameter as the dowel. My dowel rod is ⅜” in diameter so I’m using a ⅜” drill bit.
I want this widened hole to also be deeper than my cam screw, so I’ve marked the drill bit with some painter’s tape. This is a great trick for getting the depth you need without going too far down.
Use care and take your time boring out the hole. You don’t want to cause any additional damage.
Once you’re done drilling, clean any debris out of the hole and put a little bit of wood glue on the sides and in the bottom. Then put glue all around the end of the dowel that’s going to be inserted.
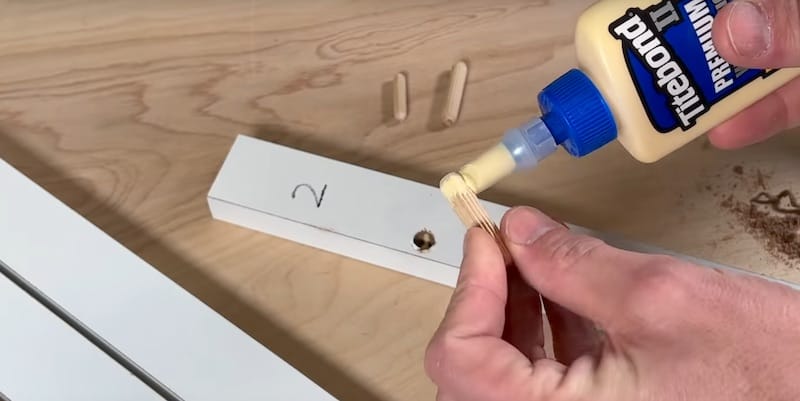
You want to get a nice coating of glue all the way around the dowel.
Insert the dowel into the hole and press it into place or lightly tamp it down with a hammer. You want to be sure the dowel is fully seated in the hole.
Thoroughly wipe off any excess glue and let the new assembly dry for 24 hours. Don’t skimp on the drying time; it’s necessary to get a solid and durable bond.
Step 3: Cutting Down the Dowel
Once the glue is thoroughly dry, I’ll apply some blue painter’s tape to the surface of my piece. This is to protect the surface when I cut down the dowel rod.
After securing the piece to my work surface with a clamp, I’ll cut down the dowel with a saw. Pretty much any hand-saw will work for this; here I’m using the saw from a mitre box.
NOTE ABOUT TOOLS: I don’t have any fancy, flush-cut saws or Japanese hand tools that are out there now; my go-to is a simple mitre box and saw. This one cost about $20 and I use it for a lot of different trim projects.
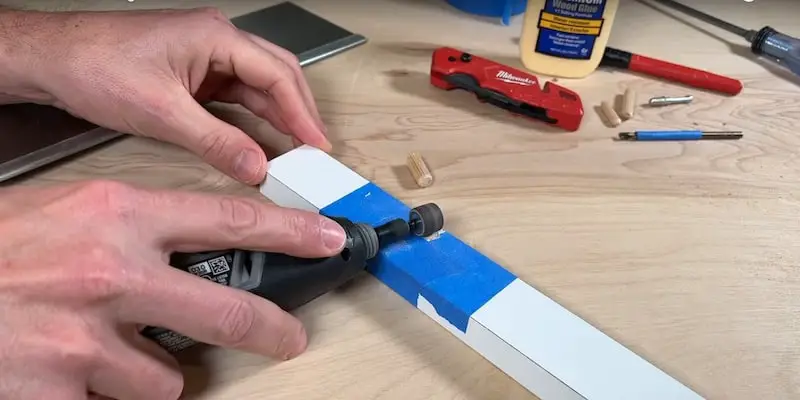
Once I’ve cut the dowel flush with the surface, I’ll carefully sand it down. It’s important to get a flush surface so that the pieces of your furniture kit fit together properly. I used a Dremel tool for this.
Step 4: Drilling a Pilot Hole in the Dowel
The last step in this repair is to drill a pilot hole for the cam screw in the implanted dowel.
First, I’ll accurately mark the center point.
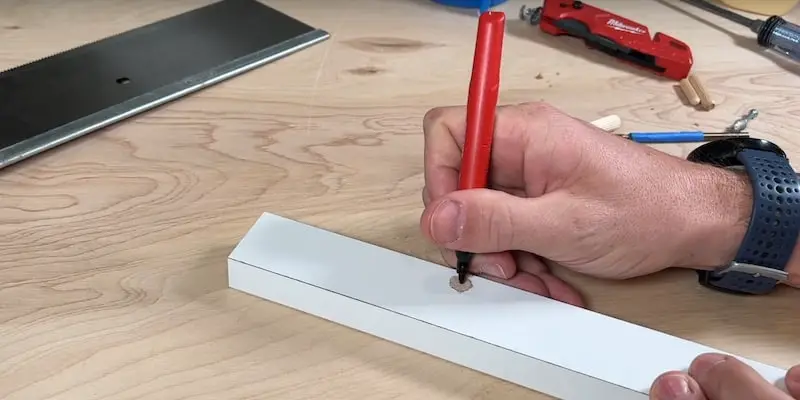
The cam screw needs to sit in exactly the right spot so that it aligns with the other piece of your furniture kit holding the cam nut. If the screw doesn’t align properly, you might have a hard time getting the nut to lock on the screw.
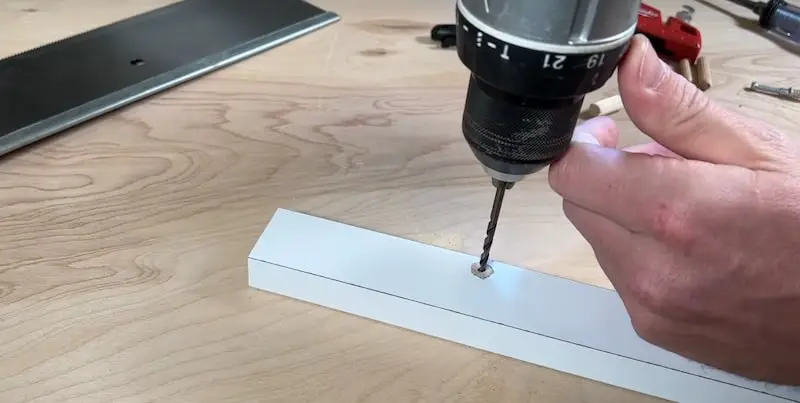
I’m going to drill this pilot hole in two stages; first with a 1/8″ bit to start it and then with the 3/16″. Starting the pilot hole with a smaller drill bit reduces the risk of damage.
NOTE: To know what size drill bit I needed, I used one of the pre-drilled holes in one of the pieces of my furniture kit as a guide but you could also just eyeball the drill bit to the screw. Cam screws can be different diameters, so be sure to use a drill bit suitable for your hardware.
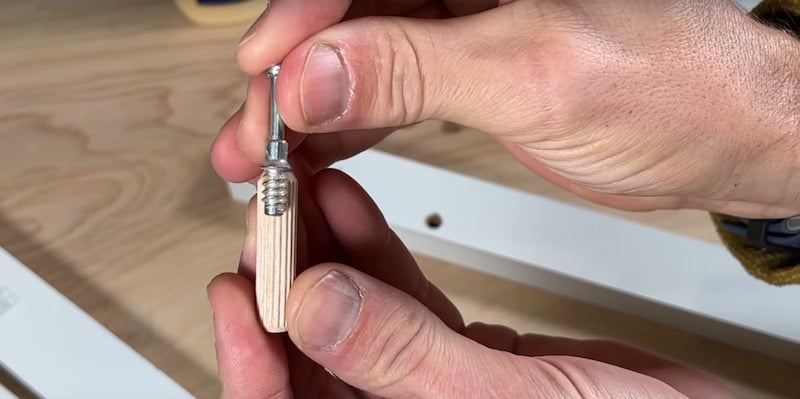
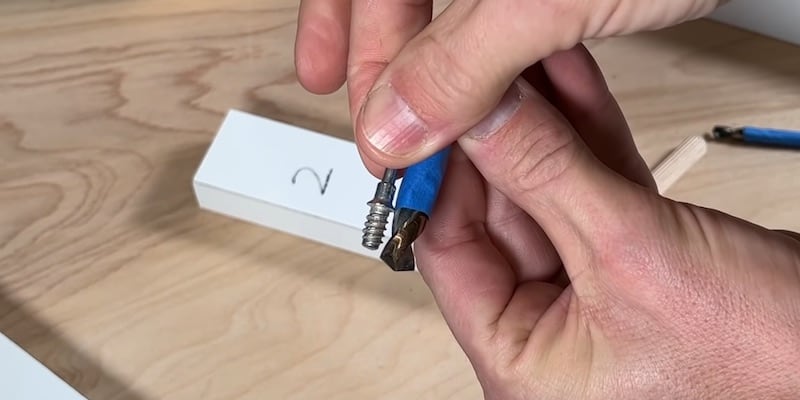
With my pilot hole drilled, I can set my cam screw in place.
Making sure it’s perfectly aligned, I’ll use a Phillips-head screwdriver to secure the screw. This way, I’ll have precise control and will be able to really feel when things are tightening down.
Avoid using a drill or impact driver for this as over-tightening is what likely caused the damage in the first place.
The screw is in place and I can feel that the hold is excellent. Using Fix #2, we have a cam screw that is secure and ready for assembly.
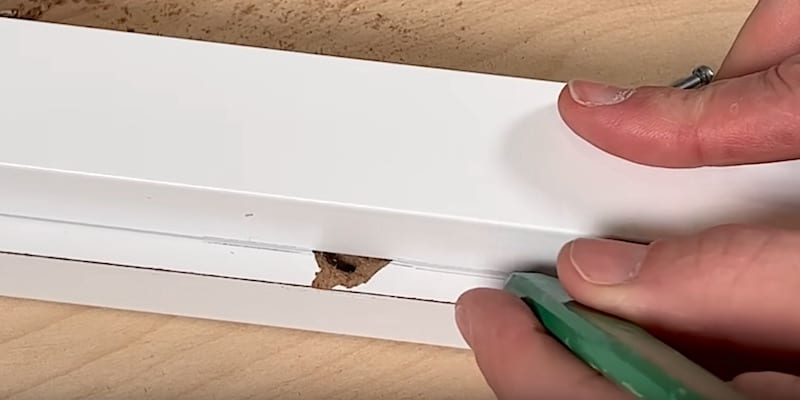
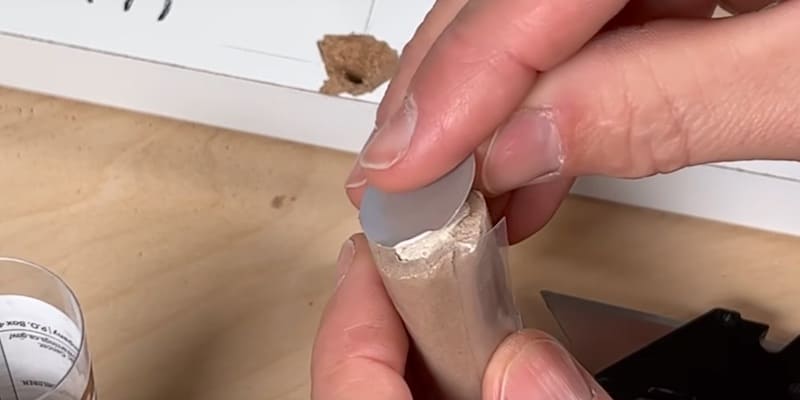
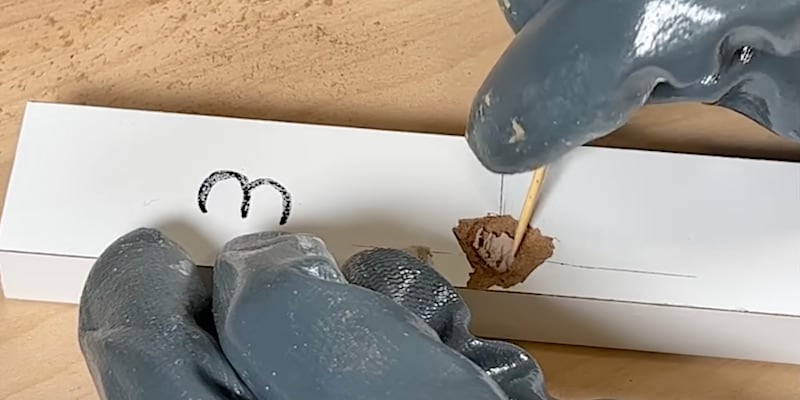
How to Fix Damaged Ikea Furniture Fix # 3: Repairing a Big Blow-Out
Our final example is where we have a total blowout of the cam-screw hole. This typically happens after the furniture has been used and the load on the screw has burdened it so much that it completely blows out the material.
In this case, you have a lot more damage than in examples 1 or 2.
Step 1: Clearing Away Loose Material
Our first step for Fix #3 is to clean off all this loose material with a utility knife and get down to solid MDF or solid particle board. Once we’ve removed the compromised material, I’ll show you how to re-establish a surface that will hold the cam screw.
I know this looks worse than it did before but it needs to get worse before it gets better, so don’t be afraid to cut away any loose material.
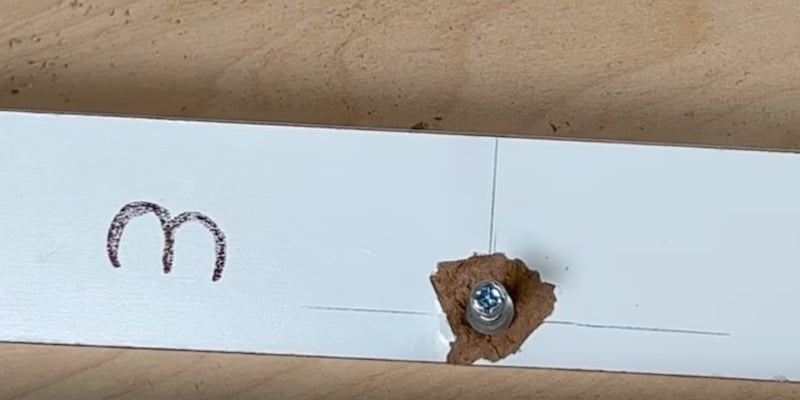
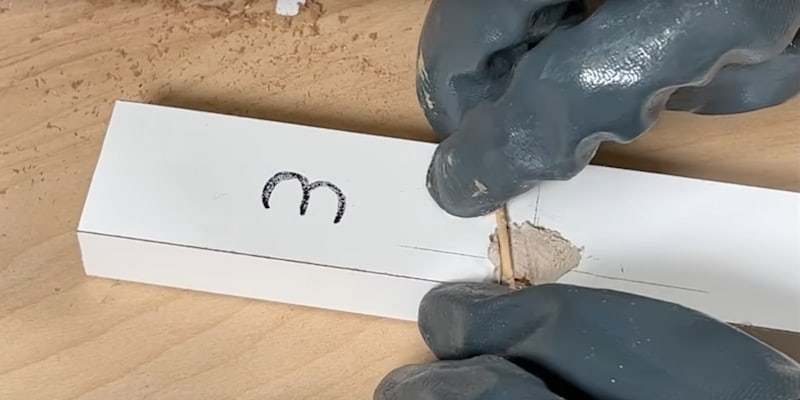
Step 2: Marking the Center Point of the Cam Screw
It’s critical to keep the exact location of the original hole so that the cam screw lines up with the cam nut in its adjoining piece, so I’m going to set up some crosshairs by marking the center with a pencil and straight edge.
These crosshairs will serve as a reference point for the center of the cam screw once I add material to the hole.
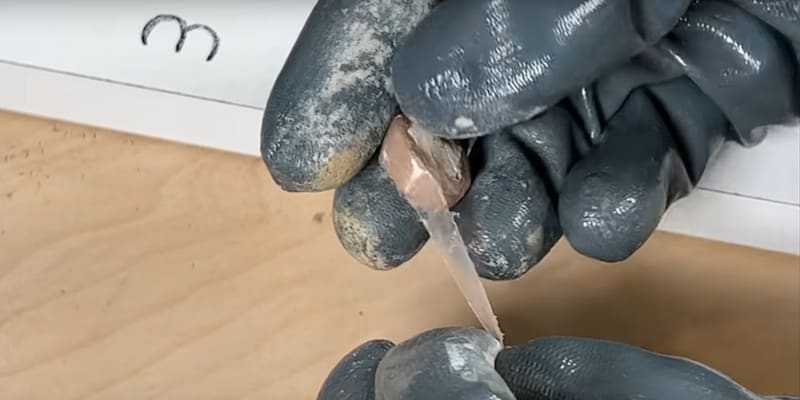
Step 3: Refilling the Cam Screw Hole
We’re going to use a JB Weld product to create new material in this cam-screw hole.
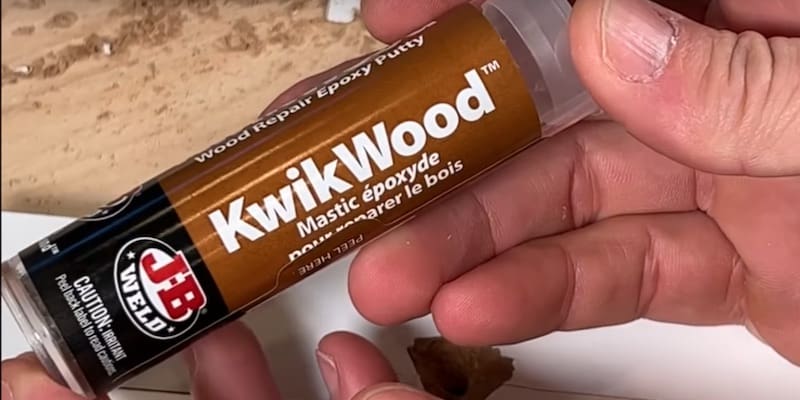
I’ve had good luck with JB Weld products over the years. This one is called KwikWood. It’s specifically made for projects such as this and will work on wood, MDF, or particle board. It sets in 15-20 minutes and will cure in an hour. After that, you can sand the filler down and reset your cam screw.
I’ve removed the product from the container. You can see there are two materials that you’ll be mixing together. Mixing them together will activate them.
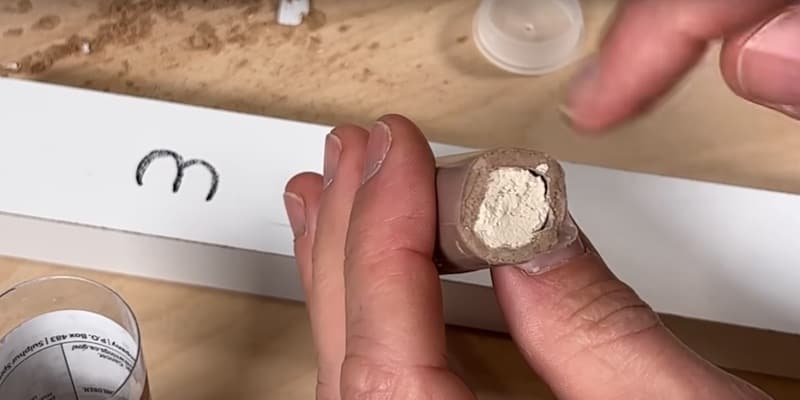
We’ll cut off a section of the KwikWood sufficient to fill the hole. We really don’t need much.

Before putting the remainder of the KwikWood back in the tube, don’t forget to put the disc back on top of the material so that it stays supple and utilizable for future projects.
It’s a good idea to wear gloves when you mix the KwikWood together.
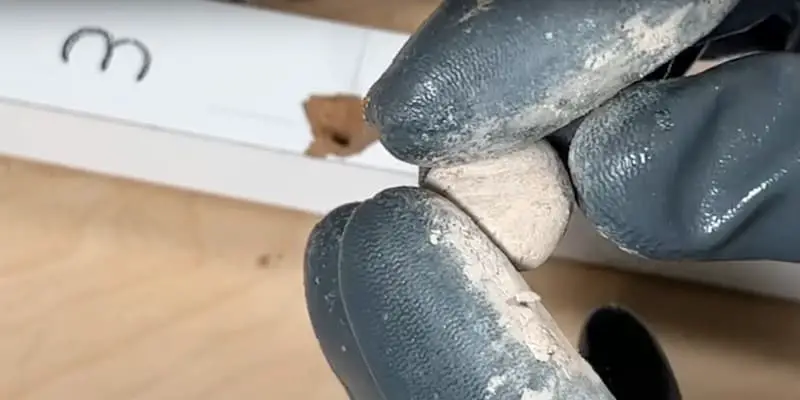
First, take the outer plastic coating off. Then, massage the material with your fingertips, mixing until you get a uniform color.
When you get a consistent color, you know the KwikWood is completely mixed.
At that point, you can start applying it to the damaged screw hole area.
I want to make sure I get a quantity of the KwikWood down into the hole, so I’m going to roll out the tip a bit so that it’s slightly less than the diameter of the bottom part of the hole.
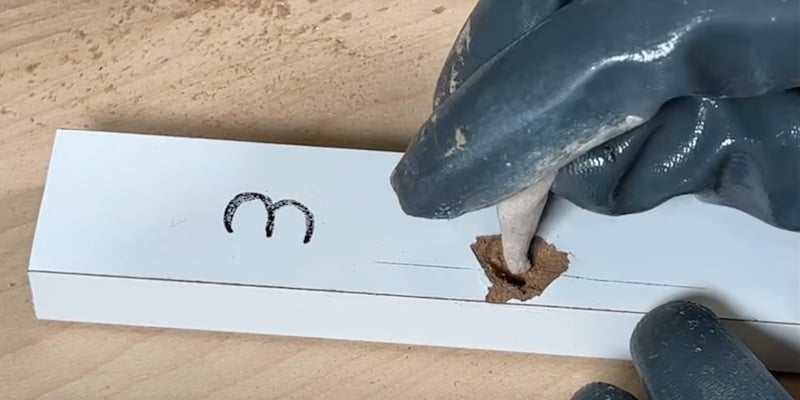
After pushing the tip of the product into the bottom of the hole, I’ll cut it off with a toothpick and then use the toothpick to work it down well.
This is an important step. If you just press the whole wad of KwikWood into the hole, it’s easy for the product to not make it all the way to the bottom.
I’ll work in stages, adding a little bit of the KwikWood at a time and pressing it in with the toothpick to fill in all the gaps.
You don’t want to add too much material because that will mean more sanding later on.
Once I’ve filled the hole, I’ll roll out the KwikWood with the toothpick to even out the surface.
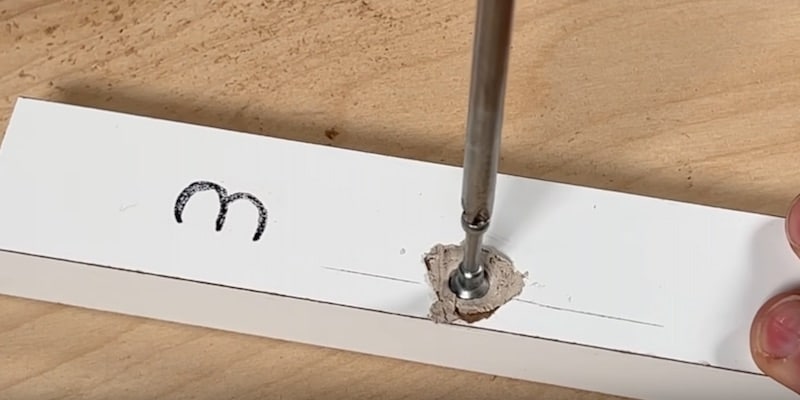
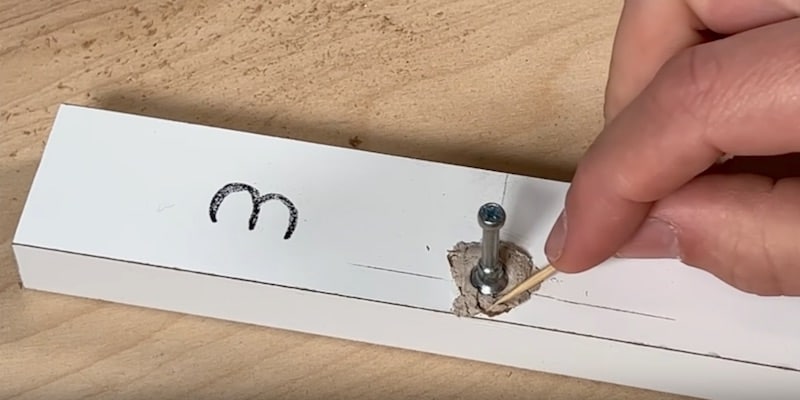
Now that the hole is filled with KwikWood, I’ll set in my cam screw. I want the cam screw to be in place when the KwikWood sets up.
Using the crosshairs that I previously marked, I’ll slowly thread the cam screw back into the hole.
Finally, I’ll take my toothpick and press the quick wood up against the cam screw, working all the way around.
A trick for this step is to lay a food storage bag on top of the KwikWood and press the material down with your fingers. The baggie will enable you to use your fingers without gloves on and will give you a smoother surface without getting any goop on your fingers.
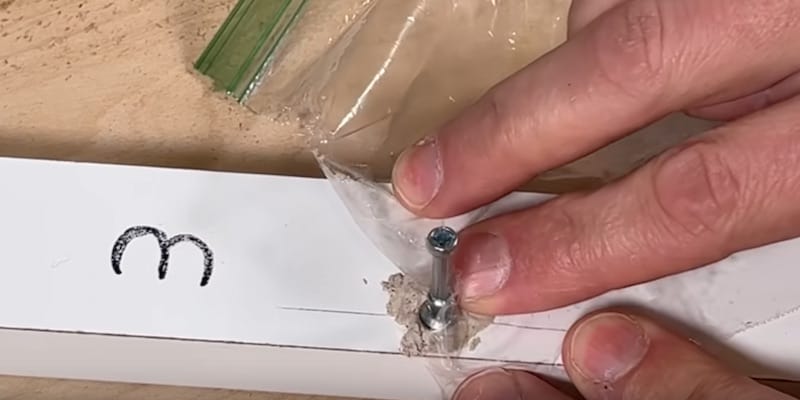
As you work, keep referencing to make sure that the position and depth of the cam screw are correct.
Here’s the cam screw set into the KwikWood as we’re going to let it set up.
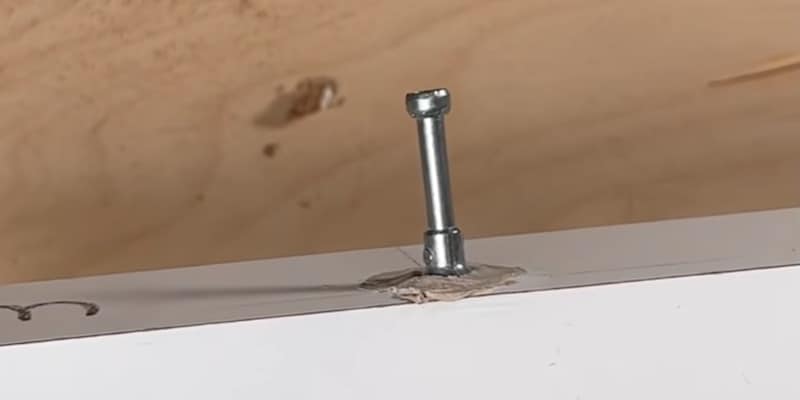
We have a little bit of extra material we’ll need to sand off later. What’s most important is that the KwikWood is fully surrounding the screw and that the alignment of the screw is accurate.
Be sure to check the orientation in both directions before leaving the KwikWood and screw to dry. Once the product dries, the screw will be fixed in that position.
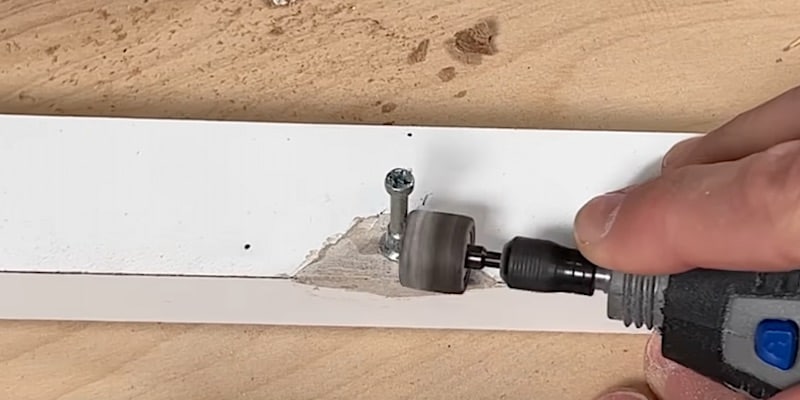
To finish the tutorial, I’ll use another piece that’s already been setting for a couple of hours.
Step 4: Sanding the Excess KwikWood
To sand down the excess KwikWood and smooth out the surface, I’ll be using a Dremel tool. You could also use sandpaper.
Because another component of the furniture is going to sit against this one, we have a little work to do to make sure the surface is flush.
Here’s the final product after sanding with the Dremel tool.
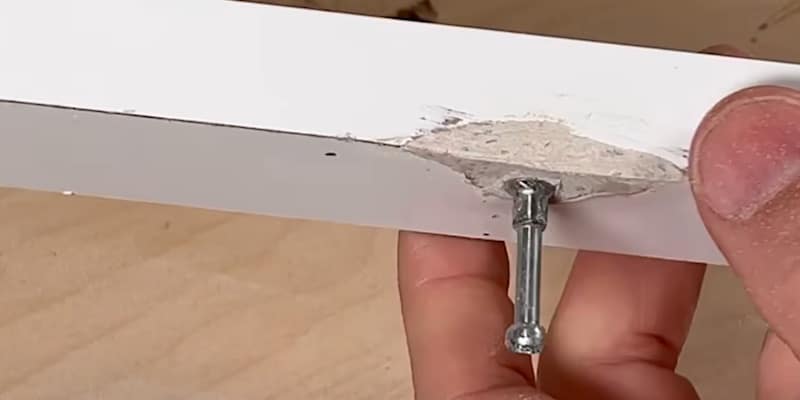
It’s not pretty but this fix for damaged Ikea-or-similar furniture is effective, in spite of having had a lot of damage on this piece. I’ll need some touch-up paint on the side that will be exposed, but the cam screw is securely held and the surface is smooth and flush so that the adjoining piece will sit properly on it, which is what really matters.
How to Fix Damaged Ikea Furniture: Conclusion
It’s already challenging to put together flat-packed furniture; when the cam screws strip out or blow out, it can be a huge frustration. I hope that one of these fixes will take your stress-o-meter down a few notches and get you back on track assembling or salvaging your furniture.
Got other home repair projects to tackle?
For an easy project to protect the vanity space under your sinks, check out our article, How to Waterproof Cabinets & Avoid Water Leaks.
To Leave Comments and Questions
If something about these ways to fix damaged Ikea furniture doesn’t make sense or if your situation is a little different, please leave a comment under the YouTube video. I check the comments on a daily basis and am happy to help out.
Don’t forget to subscribe to our channel as we have weekly videos coming out to help you with your everyday home repairs.
We’ll catch you on the next one! Take care.


