
 My Account
It’s hard to beat the bang for your buck that you get from installing recessed ceiling lights. In today’s article, I’ll show you how to upgrade your home with ultra-thin LED recessed lighting. Besides adding value to your home (far beyond the cost involved), you’ll also transform a dark room into a space that has all the light you could possibly want.
My demo space for this DIY project is a living room that doesn’t have a ceiling light. It does have a switch on the wall that controls one outlet, which at one time surely had a lamp plugged into it so that you could turn on a light when you came in the front door.
I’m going to use this light switch to control the LED recessed lighting that I’ll be installing. In this room, I’ll be putting in eight ultra-thin pot lights. I got these on Amazon for about $10 per unit. What’s cool about these lights is that you can select the color temperature of the light, which ranges from 2700 Kelvin to 5000. This is handy if you want to match the light color of these ceiling lights to other lighting or fine-tune it to the space.
DIY Recessed Lighting: Step-by-Step Guide
In this step-by-step guide, I’ll walk you through the whole process of installing recessed lighting in a ceiling from start to finish. I’ll start with planning out how many pot lights I need and where to put them. Then, I’ll cover how to cut the holes, how to set up a junction box, how to rewire the switch, and how to wire up all the LEDs.
So let’s jump into it!
Rather watch than read? Check out this 16-minute video.
DISCLAIMER: This video and description contain affiliate links, which means that if you click on one of the product links, I’ll receive a small commission.
DIY Recessed Lighting: Supplies, Tools, and Costs
Supplies
- Amico 6″ LED Lights
- 3/8″ Cable Clamps
- 14/2 50-ft Romex
- 14/3 50-ft Romex
- Metal Junction Box
- Junction Box Lid
Tools
- 6 3/8″ Hole Saw
- Wire Strippers
- a screwdriver
Cost
- About $200
DIY Recessed Lighting: Planning Out the Number and Spacing of Fixtures
The living room for our demo is 19′ x 14’5” — a fairly long, narrow space. I’m going to install eight recessed ceiling lights along two simple lines.

For a more in-depth look at planning the number and spacing of pot lights, check out our YouTube video.
DIY Recessed Lighting: Measuring and Marking Out the Location of Fixtures
Once you’ve planned out the spacing of your ceiling lights, you’re ready to mark out the location of each fixture.
I’m going to put two lines of painter’s tape across the ceiling to act as a guide. To do this, I’ll first apply little bits of tape across the ceiling every two feet or so (doesn’t have to be precise), inset 48” from the wall. I’m using the 48” side of a drywall square to measure the distance from the wall.
With these little bits of tape applied to the ceiling, I’m going to run a continuous piece of painter’s tape across them to literally connect the dots.
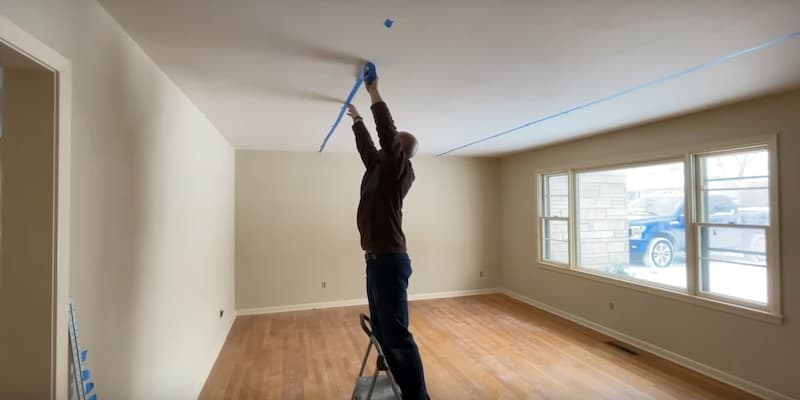
The line of tape doesn’t have to be perfect because I’m going to use my laser measuring tool to pinpoint the distances indicated on my diagram.
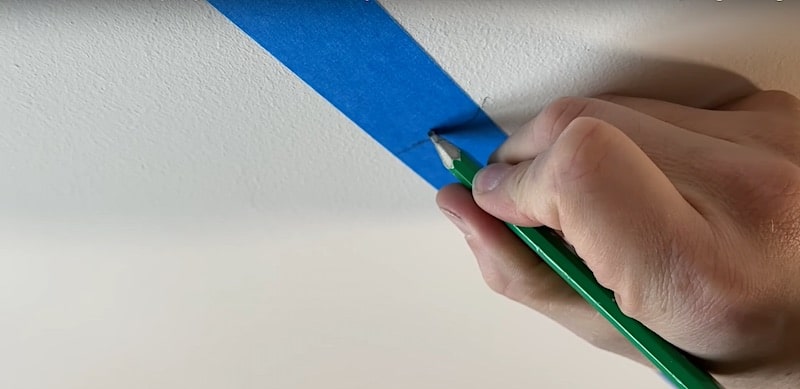
When I mark the center of the hole for each of the recessed lights, I do want to be accurate.
DIY Recessed Lighting: Prepping and Cutting the Holes
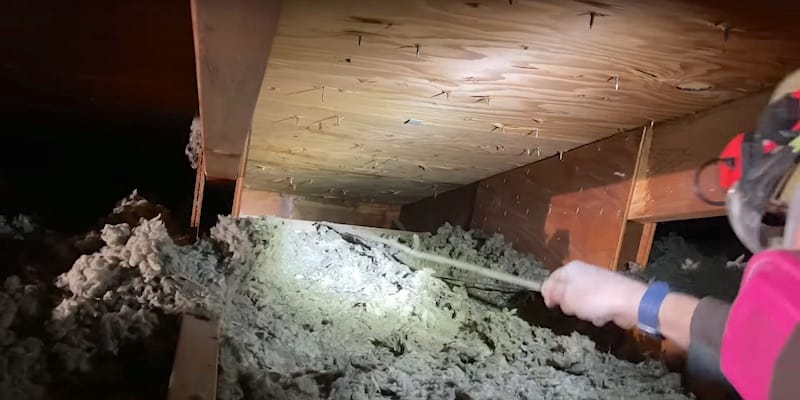
Before I cut the holes for each of my recessed lights, I’ll do a little prep so that I don’t have insulation falling through the holes as I cut them. To do this, I’m going to flag the location of each fixture in the attic and clear away the insulation at each point.
This might sound tricky but all it entails is drilling the center point of each location with a 3/16-inch drill bit, rolling up a marking flag, and passing it through each hole into the attic space.
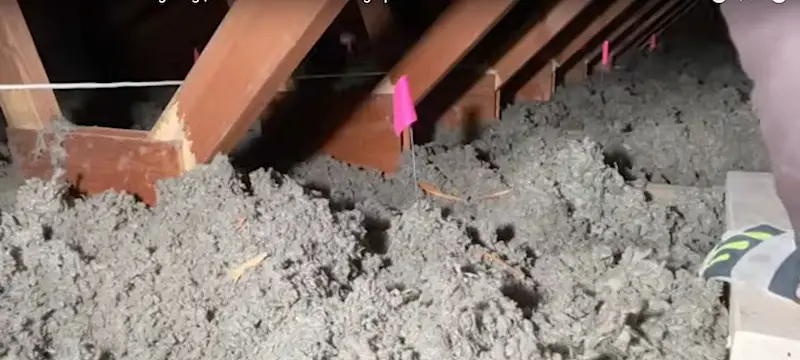
Then all I have to do is go up into the attic and clear away the insulation around each of the flags.
SAFETY NOTE: Remember to wear a respirator when you’re up in the attic doing this; there will be a lot of airborne particles as you move the insulation around. You don’t want to breathe those in.
With the prep done, I’m ready to cut the holes for my recessed lights.
I used a 6 3/8″ hole saw specifically made for this purpose. It has carbide teeth that are optimal for cutting through drywall and plaster.
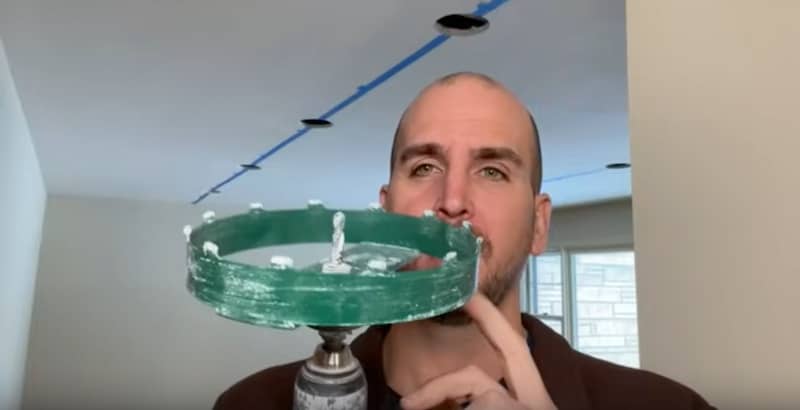
CAUTION: If there is a ceiling joist right above where you’re cutting a hole, you’ll want to use extra care. If you push through too far with the saw as it breaks through the ceiling, the teeth can catch on the ceiling joist and possibly cause damage.
If you have a ceiling that’s just drywall, it will be pretty easy to cut. In this house, I’ve got a half-inch of drywall and a quarter-inch of plaster. In two of the locations, I even had some wire mesh that made cutting the hole a lot more difficult and messy.
For more help on drilling holes, have a look at our YouTube video.
DIY Recessed Lighting: Wiring
Now to reconfigure the electrical.
Recapping the Situation
To recap, there are two switches on the wall in this room as I come in the door. One is connected to an outlet where a lamp would have been plugged in and the other controls the porch light. Power is coming downstream to these switches from another outlet in the room and the wiring runs up through the attic.
So what I”m going to do is install a junction box in the attic. I’ll reroute the power that was going to the switches through the junction box and then send it out through 14/3 Romex. The 14/3 has the extra (red) wire needed to power my pot lights. The black will provide power to the porch light and the outlet (which will no longer be connected to the switch).
I only need 14/2 Romex between each of the pot lights because I’m just daisy-chaining those together.
Pulling New Romex
SAFETY NOTE: Before starting any electrical project, I want to turn off power at the breaker box and confirm with a voltage that there is no current flowing.
The tricky bit of the wiring portion of this recessed lighting project will be getting my new stretch of 14/3 Romex from the electrical box containing my switches up into the attic. I’ll accomplish this by basically splicing the new Romex to the old wiring, then pulling the old wiring up into the ceiling, bringing the new Romex with it.
To create the splice:
- Remove the old switches.
- Strip the new 14/3 Romex in a staggered approach (doesn’t matter which are longer and which are shorter).
- Connect the stripped wires from the new Romex to the neutral wire in the box by twisting the wires together with pliers until the bundle is as tight and smooth as possible.
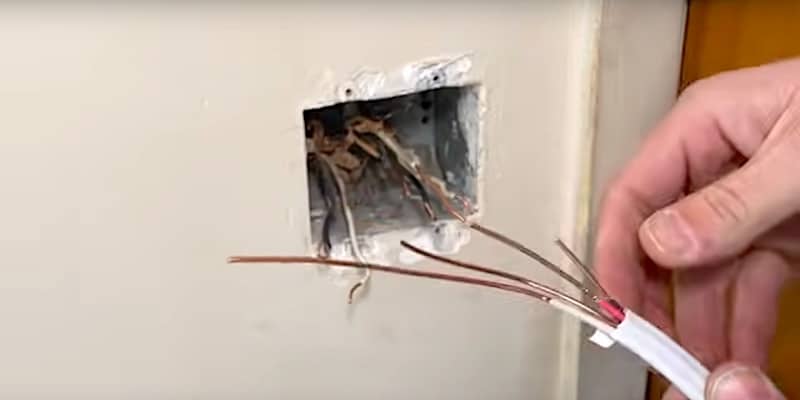
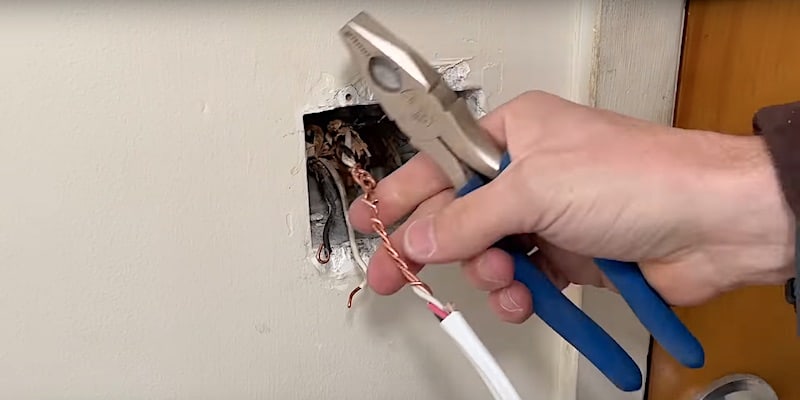
Lastly, I’ll wrap the bundle with electrical tape and run my hand over it to ensure that there’s nothing sticking out that could catch as I’m pulling the wires up into the attic.
With our new Romex spliced to the old wiring, we’re ready for the fun part: pulling the wires up into the attic. Hopefully, you have a little more headroom than I did!
REMINDER: Wear protective eyewear and a respirator when doing this.
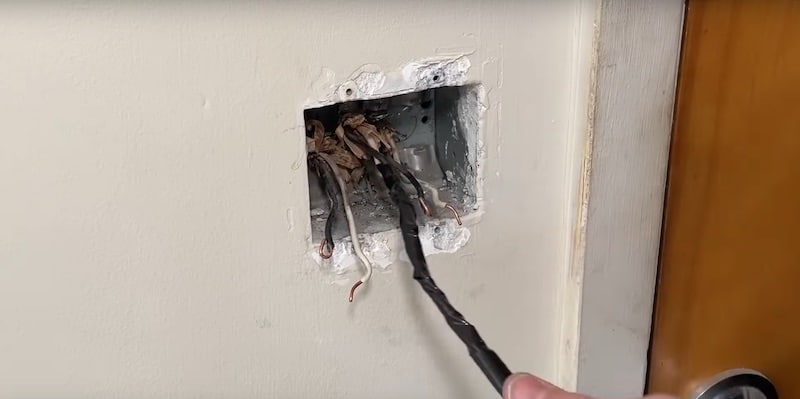
Once I have the new Romex pulled into the attic, I no longer need the old and new wiring spliced together. I’ll just snip the new Romex off below the splice.
If you succeed in pulling the Romex up into the attic with no snags, be thankful for small favors. If, on the other hand, your wiring is connected to the studs like mine was, this step could turn into a big one.
I had to cut a hole in the drywall to release the old wiring that was attached to the stud. (We won’t cover the drywall repair that I’ll be facing in this tutorial.)
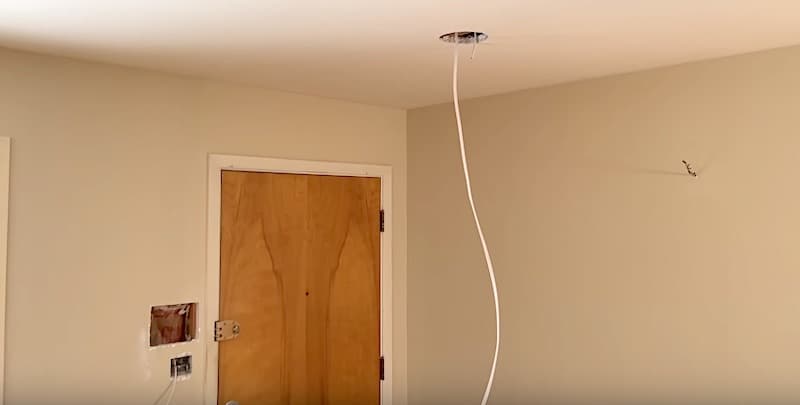
In the image, you also see the 14/2 Romex that will bring power to the first pot light that I’ve fed up into the attic.
Mounting the Junction Box
Before we get into wiring the fixtures, I’m going to mount and wire up the junction box in the attic.
First, I’ll affix my metal junction box to one of the ceiling joists.
I’ve fed the old wiring (that’s bringing power) into the box and cut it to length, leaving a little extra.
Next, I’ll feed into the junction box the new Romex 14/3 that I pulled up into the attic.
Finally, I’ll feed in the end of the Romex 14/2 that will carry power to my pot lights.
After having fed the incoming and outgoing wires into the junction box, I’ll tighten them all down at the ingress points with a screwdriver.
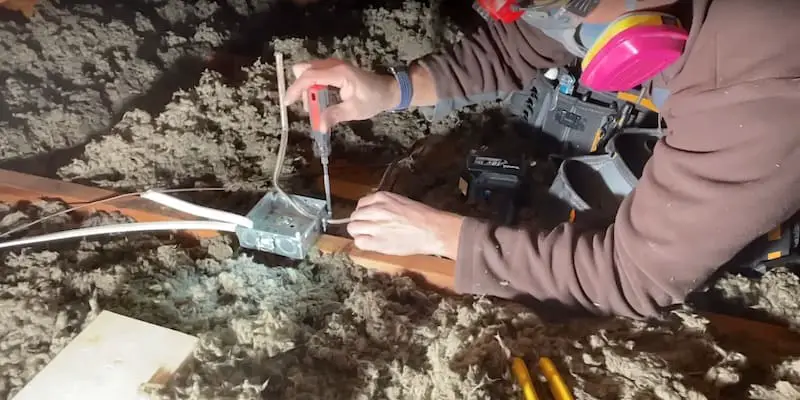
The last step before wiring things up in the junction box is trimming down all the interior lengths of wire a bit, removing the plastic casing from the Romex, and stripping the wires.
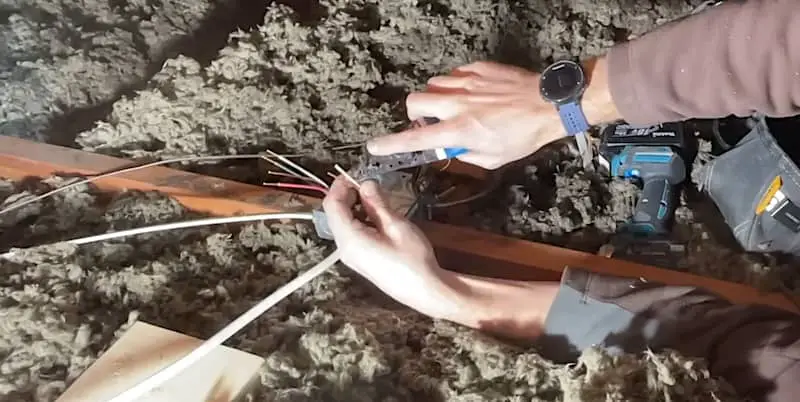
Wiring the Junction Box
Neutral and Ground Wires
I’ll connect all three neutral wires coming into my junction box together, then all three grounds.
Hot Wires
- The black hot wire coming into the junction box will connect to the black hot wire in the 14/3 Romex leading down to the wall switch.
- The red (switched power) wire from the 14/3 will connect to the black hot wire in the 14/2 going out to the fixtures.
Wiring the Electrical Box and Switches
Back down at the electrical box on the wall in the living room, I’m going to connect all the wires and install my switches.
I have three sets of wires in the box:
- wires from the outlet below the box
- wires from the porch light
- Romex 14/3 from the attic, which is bringing power into the box and switchable power back to the recessed lighting
After trimming the Romex to length and removing the plastic casing, I’ll:
- strip all the wires
- connect all three ground wires and secure them to a grounding screw in the box
- connect all three neutral wires
- connect the incoming power (black hot wire from the new Romex 14/3) with the hot wire going to the receptacle and add two pigtails for the switches
- connect one pigtail to the switch for the recessed lighting, then connect the red wire from the Romex 14/3 to that switch
- connect the other pigtail to the porch light switch, then connect the hot wire from the porch light to that switch
- lightly remount the switches (without the switch plate for now; we’ll put that on after we’ve installed a couple of lights and tested the circuit)
Installing the Recessed Lights (Daisy-Chaining and Wiring)
Now that I’ve got the junction box set up and the switches rewired and remounted, I’m ready to install the pot lights themselves.
I’ve got eight lights to install and I’m going to be daisy-chaining them.
TIP: Before starting the installation of the lights, you might want to set the light temperature on each driver box to the same level of desired warmth or coolness. For this space, I’m setting the temperature to 3000 on the Kelvin scale, which is a warm white, good for this type of environment.
Because I’m stringing these recessed lights together, I’ll need to add two ⅜-inch cable clamps to each of my driver boxes, with the exception of the last one, which will only need one. These cable clamps secure the Romex so that any strain on the cable doesn’t compromise the connections inside the driver box.
Note that cable clamps don’t come with the recessed lighting kit. You can pick them up on Amazon for about $15 for a pack of five.
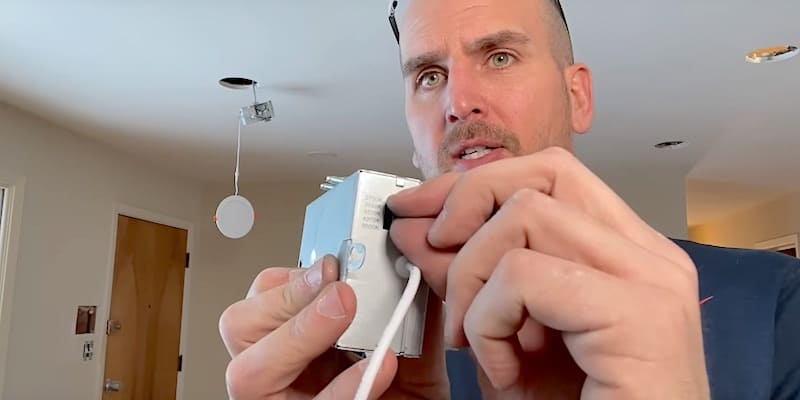
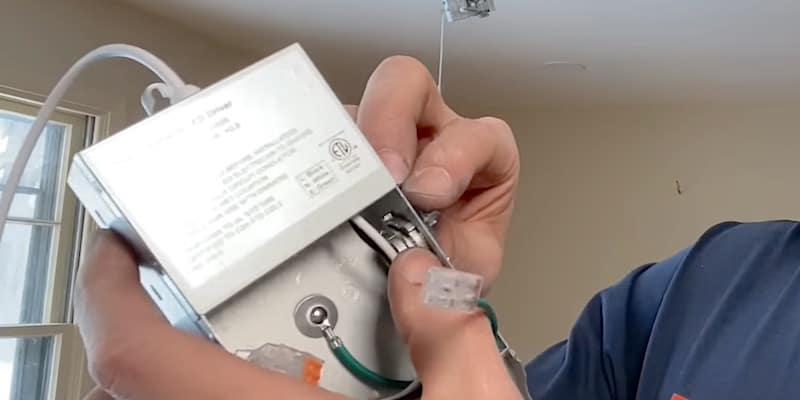
Let’s look inside the driver box of each recessed lighting fixture.
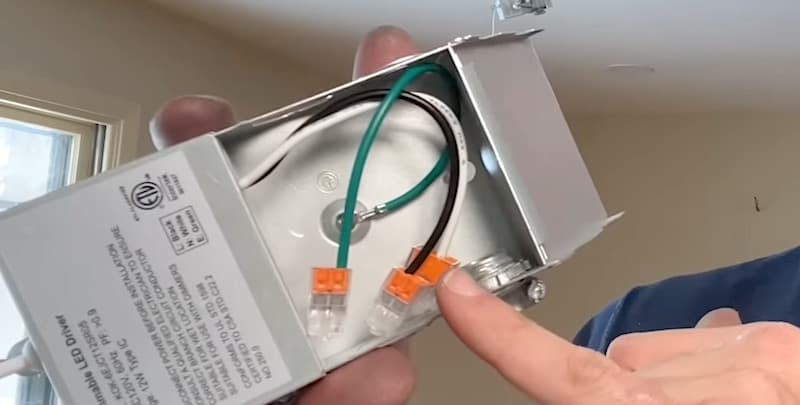
As you’d expect, there are three wires inside the driver box — hot, neutral, and ground — with push-pin connectors already attached for the incoming and outgoing Romex.
I’m going to wire up two pot lights and test them out before installing the rest.
Starting with my first pot light and the Romex 14/2 that’s coming out of my junction box, I’ll:
- pass the Romex 14/2 through one of the cable connectors on the driver box
- connect each wire of the Romex to the appropriate push-pin connector inside the fixture
- tighten down the screws on the cable connectors
To wire up the second pot light, I’ll fish some more Romex 14/2 up through the second hole, across the attic, and back to the first hole, where I’ll connect it to the driver box in the same way (obviously passing the Romex through the vacant cable connector this time).
If I haven’t done so previously, I’ll set the light temperature switch on the driver box to the desired level of warmth or coolness. I generally set the temp to 3000 for living spaces such as this.
The last step to install the recessed light is to connect the LED element itself to the cable coming out of the driver box and press it up into the hole.
Seeing as I’m going to be testing, I’ll only attach the incoming Romex and the LED element on the second fixture, and just leave it dangling there.
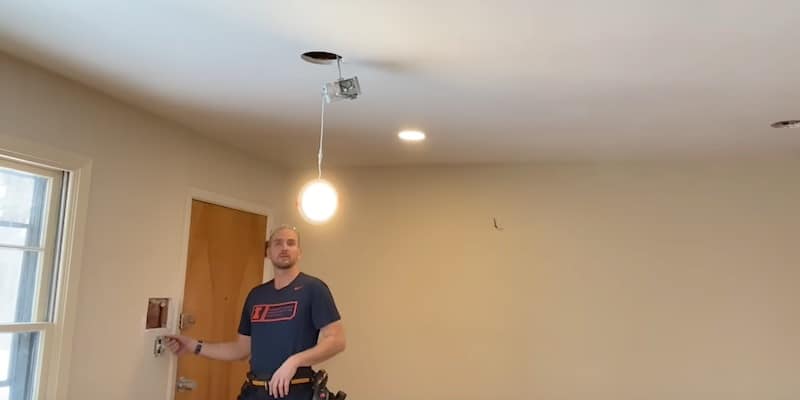
When I flip the switch, the lights come on!
I also want to test out everything else on the circuit — in my case, the outlet and the porch light — before moving on.
Good to go! Now to install the rest of the lights.
DIY Recessed Lighting: Finished Product
You can see that this recessed lighting makes a huge difference in this space. It’s the living room and it’s the first thing you see when you come into the house. We are renovating this house to resell it, in which case transforming the dark living space will really help in terms of first impressions.

Adding a dimmer switch would be a nice touch. But with the lights up full like this, there’s all the light you’d ever want.
I spent about $200 on supplies for this project. When you consider the added value and liveability that recessed ceiling lighting brings to a home, this kind of investment is pretty much a no-brainer.
Other Lighting-Related Projects
To see another lighting-related DIY project, please check out our step-by-step guide, How to Install Utility Lighting with Motion Sensor.
To Leave Comments and Questions
Now you have the information and confidence to install recessed lighting in your own home or investment property!
If something doesn’t make sense or if your situation is a little different, please leave a comment under the YouTube video. I check the comments on a daily basis and am happy to help out.
Don’t forget to subscribe to our channel as we have weekly videos coming out to help you with your everyday home repairs.
We’ll catch you on the next one! Take care.


