
 My Account
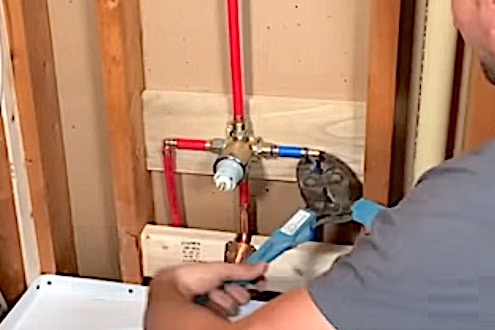
The topic of today’s tutorial is how to convert copper water lines to PEX and then install a Delta R10000 mixing valve, tub spout, and shower adapter.
The bathroom I’m using for this demonstration has a tub-shower combo but this process can be applied to a shower-only setup as well.
How to Install PEX Water Lines and a Mixing Valve: Step-by-Step Guide
In this step-by-step guide, I’ll first be transitioning half-inch copper water lines to PEX type B using SharkBite couplers. The PEX-B is an awesome product and very forgiving, which makes it great for DIYers.
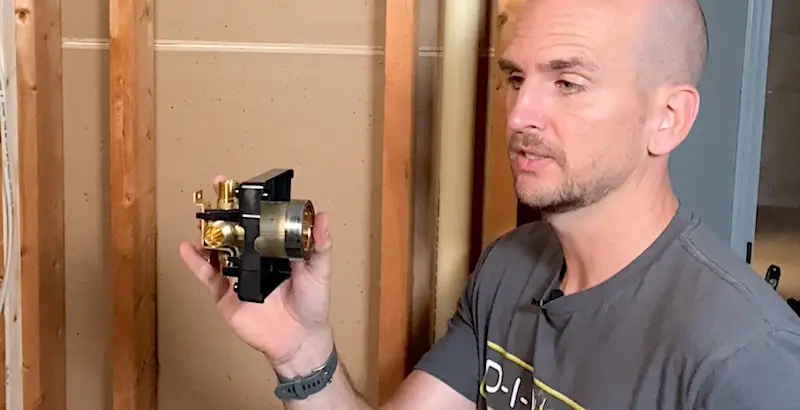
After the new water lines are in place, I’ll walk you through the process of installing what I think is the best mixing valve on the market: the Delta R10000. This component is tried and true, but if you ever have an issue with your cartridge valve or need parts, they’ll be readily available.
Rather watch than read? Check out this 20-minute video.
DISCLAIMER: This video and description contain affiliate links, which means that if you click on one of the product links, I’ll receive a small commission.
How to Install PEX Water Lines and a Mixing Valve: Supplies, Tools, and Costs
Supplies
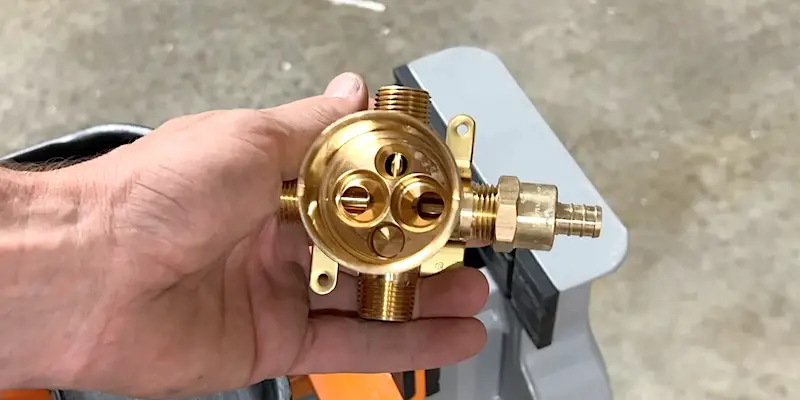
- Delta R10000 Valve Body (used for this installation)
- Delta R10000 Valve Body with PEX adapters and tub spout drop already integrated (I discovered this product later but it is really perfect for this project)
- ½-inch PEX-B
- two ½-inch SharkBite couplers (to transition from copper to PEX)
- two 90-degree angles for PEX
- 1 ¼-inch deck screws
- Teflon tape
- pipe dope
- pieces of 2×4 and 1×6 for the support blocks
Tools
- measuring tape
- impact driver
- tube cutter
- deburring tool
- Emery cloth
- laser (optional)
Costs
I spent $314 on the Delta R10000 mixing valve and supplies.
How to Install PEX Water Lines and a Mixing Valve: Adding Block Supports
Before tackling any plumbing, I’m going to add some blocks between the studs to support the elbow for the shower head, the mixing valve, and the tub spout.
This isn’t a complicated task but I do want to do this work with care so that the supports end up positioned in exactly the right spots.
I’ll start by taking some measurements. There are three critical measurements here and one of them is constant.
The constant measurement is the distance from the stud at the back wall to the center point of the drain. We want everything to line up perfectly with the middle of the drain. In my case, that’s 14 ½ inches.
Next, I’ll measure and mark the height of the support blocks for the shower arm and tub spout.
Support Block for the Shower Arm
I”ll be using a two-by-four to make my support block for the shower arm, cutting it down to the distance between the studs.
I want the center of the shower arm to be 80 inches from the floor, but my measuring tape only goes as far down as the two-by-four at the bottom of the framing.
To calculate the position of the top of the block, I’ll need to subtract the height of the two-by-four at the base of the framing (1 ½ inches) and add the distance the arm will sit from the top of the block (three-quarters of an inch).
80 – 1.5 + 0.75 = 79.25 inches
I’ll mark the height of 79 ¼ inches on both studs to indicate where to line up the top of the block.
The block needs to be offset inside the wall cavity, however. The shower arm is 1 ¼ inches deep and I want it to be slightly set back into the finished wall surface. I’m mounting it in the area above the surround where there will be half-inch drywall. So I’m going to set the block back into the wall cavity three-quarters of an inch.
Before screwing the block into position, it’s a good idea to do an eyeball test. Just tap the block into place, hold the shower arm against it, and look at it from the side to see if it lines up correctly. It should sit within a quarter of an inch of the finished drywall surface.
The positioning looks good so I’ll sink two screws per side to secure the block to the studs.
Support Block for the Mixing Valve
Because I have a tub and shower combo, I’ll be placing my Delta R10000 mixing valve 30 inches off the floor because it needs to be reachable by a person sitting in the tub. If this were just a shower, I’d place it 48 inches above the floor.
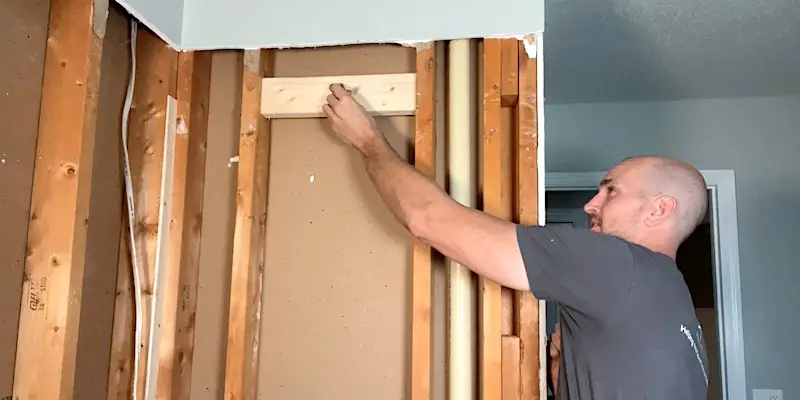
The mixing valve needs to be set into the wall so that its exterior surface sits flush with the surround. The thickness of the Delta R10000 from the exterior plate to the back of the mounting flange is about 2.8 inches, so let’s say 2 ¾ inches.
My acrylic surround will be sitting right up against the studs. I won’t have any build-out as I’d have with tile, so pretty much all of the mixing valve will be set back into the wall cavity. This means I won’t have room for a 2 x 6 block; I’ll be using a 1 x 6 instead.
Because the thickness is reduced, I’ve chosen a wood that’s a bit denser than pine, and I’ll set it all the way back in the wall cavity.
Support Block for the Tub Spout
I want the stub for my tub spout to sit 4 ¼ inches above the top surface of the tub. I also want to make the installation more stable, so I notched out the top of the support block that I made from a piece of two-by-four. This way, the elbow of the stub will sit in the notch, giving me more surface area to fasten it to.
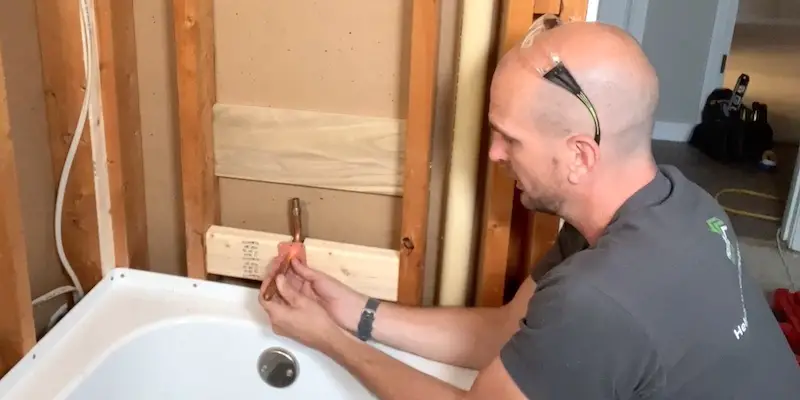
I mounted the block for the tub spout flush with the front of the studs and the bottom of the notch 4 ¼ inches above the top surface of the tub.
How to Install PEX Water Lines and a Mixing Valve: Transitioning the Copper Lines
I’m going to be replacing my copper water lines for the tub and shower with PEX-B using SharkBite connectors. I’ve chosen these materials because this is a DIY project. Both the SharkBite couplers and the PEX-B are easy to work with so they’re a convenient choice for do-it-yourselfers.
NOTE: If you’re comfortable soldering copper pipe, you will likely want to leave your copper lines in place as it is the most resilient material for water lines.
I’ll be transitioning my half-inch copper pipe to half-inch PEX-B using half-inch SharkBite couplers specifically made for this purpose.
The little white insert at one end of the coupler is designed for PEX.
The PEX will sit on the inside of the connector, giving it a bit more rigidity. The O-ring, which is the critical piece in a SharkBite fitting, will help to ensure PEX maintains a watertight seal.
NOTE: I had previously cut and capped the copper lines so that I could keep the water on in the house. Now that I’m going to be cutting them even further and transitioning to PEX, I’ll need to turn the water off.
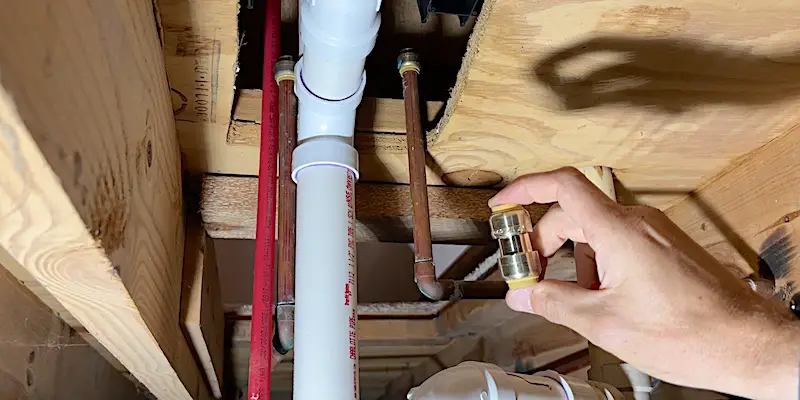
Some people are dubious about the longevity of these SharkBite connectors. Seeing as I have easy access to them in the crawl space, I’m not that concerned. If I ever need to service them, it won’t be difficult.
Down in the crawl space, the incoming water lines are as you’d expect: the cold water line on the right, and the hot on the left.
I’m going to cut the lines about 4 inches above the bend.
TIP: With the copper line barely cut, let the water drain out before completely detaching it. If by chance your water main is not off, this will be your indicator and will also prevent a massive water infiltration.
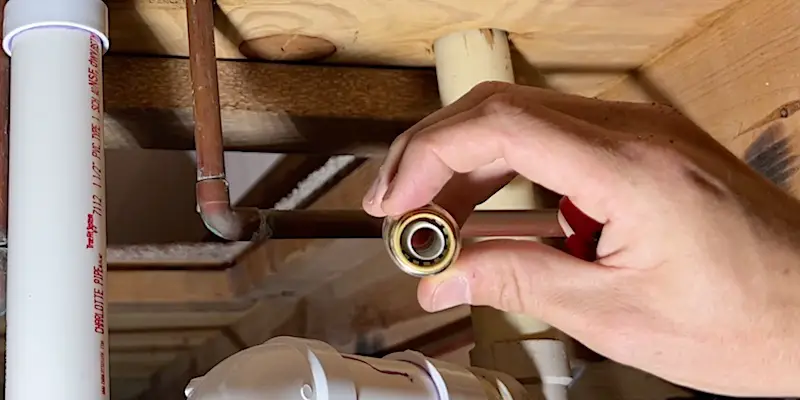
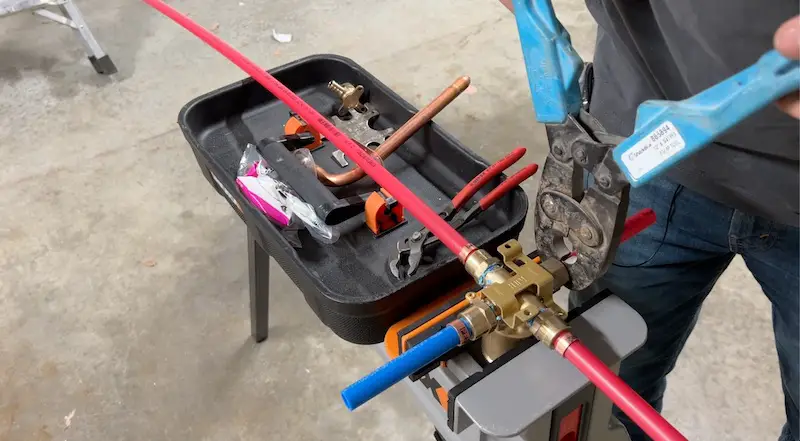
After cutting my copper water lines, I’ll de-burr them with a de-burring tool and some Emery cloth. Any burrs left on the pipe can damage the O-ring of the SharkBite fittings, so you don’t want to skip this step.
I’ve passed the 5-foot lengths of PEX down from the bathroom and marked both the copper pipe and the PEX (blue for cold and red for hot) so that I know how far to insert each of the lines into the coupler (0.95 inches for each line). Then I’ll just insert the lines into the fitting up to the mark.
NOTE: When you start inserting the line into the fitting, you’ll feel some resistance as the line starts to hit the O-ring. Push past that resistance to completely insert the pipe. Not going to the full depth is probably the leading cause of SharkBites leaking.
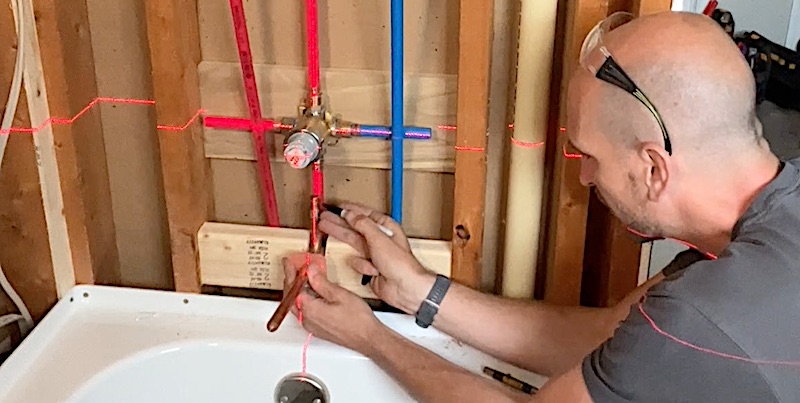
How to Install PEX Water Lines and a Mixing Valve: Mounting the Valve
To get my Delta R10000 mixing valve ready, I’m going to use threaded straight adapters with some Teflon tape and pipe dope but you could solder in PEX adapters. Don’t use 90-degree elbows here; you’ll have a hard time tightening and orienting them.
PRO TIP: Better yet, Delta makes a valve that has integrated PEX fittings and the tub-spout rough-in already soldered in. This would have saved me the task of threading on the PEX fittings that I go over in the next section. It would also have given me a less restrictive path to my tub spout. (Many thanks to our viewers for this pro tip!)
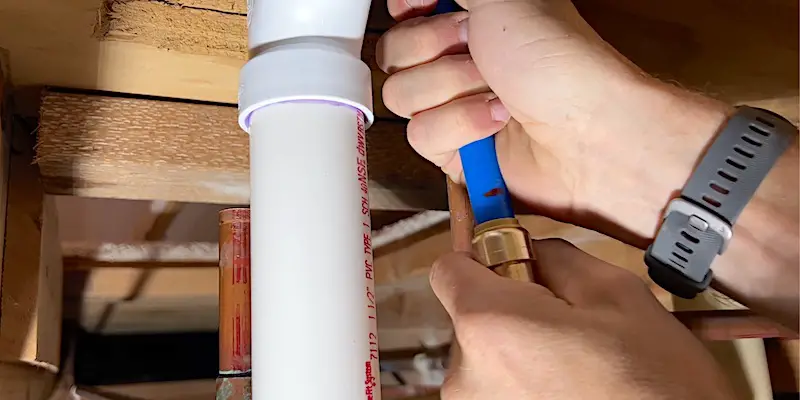
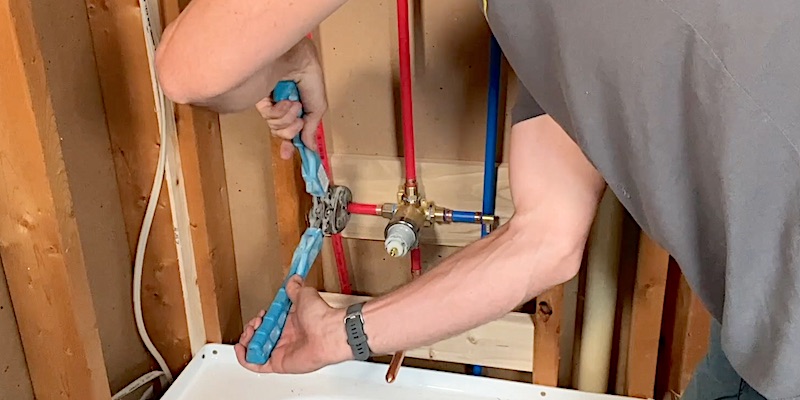
After tightening up all the adapters, I’ll crimp on the PEX for the incoming hot and cold, the tub spout, and the shower arm, checking everything with a go/no-go gauge.
With the PEX crimped onto the mixing valve, I’m ready to mount it to the support block.
I’m going to use a laser to mark the center point of the valve as I screw it into place. (A laser is a very handy tool for work such as this. Please refer to our Amazon store for a decent-quality laser, good for DIYers, that costs around $100.)
The coordinates for the crosshairs are my desired height (in this case, 30 inches) and the center point of the drain (in this case, 14 ½ inches from the back wall).
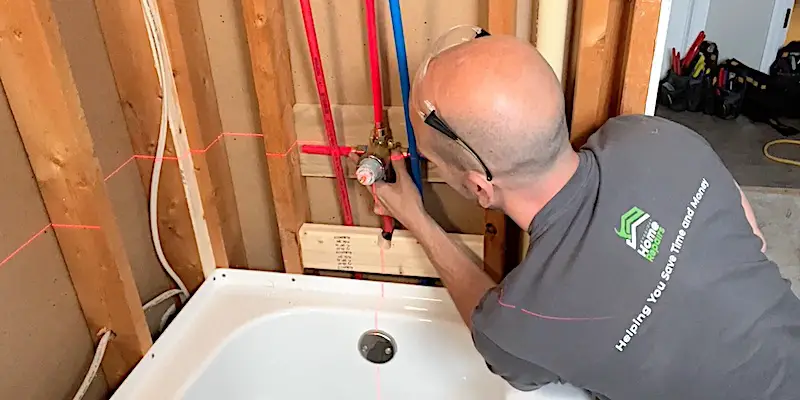
Now that X marks the spot, all I have to do is line up the center of the valve (where the handle will attach) and fasten it to the block with screws. I’m using 1 ¼-inch deck screws for this.
TIP: As you’re securing the valve, check to make sure it’s level. If you’re using a laser, the horizontal beam will be an easy reference for this.
How to Install PEX Water Lines and a Mixing Valve: Mounting the Shower Arm and Connecting the PEX
The shower head was previously a bit low, so I’m going to place the new shower arm a bit higher, at 80 inches off the floor.
My laser is conveniently indicating the center point of the shower arm with respect to the drain and I’ve already marked the height of the arm on the support block I installed earlier.
After fastening the shower arm to the block, I’ll cut the PEX to length and crimp it onto the arm.
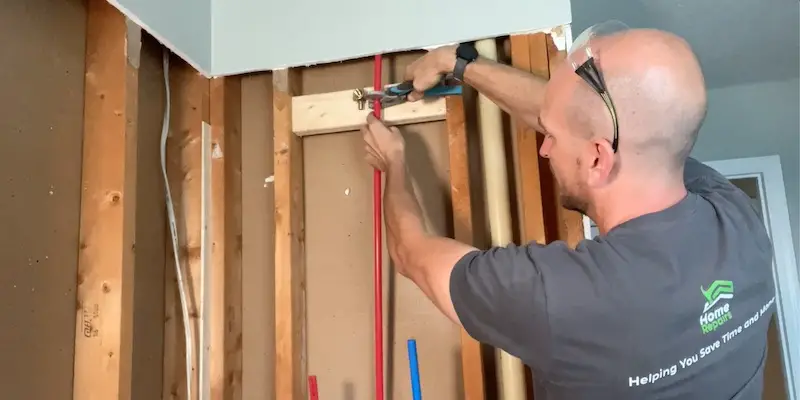
My last step here is checking everything with a go/no-go gauge.
How to Install PEX Water Lines and a Mixing Valve: Mounting the Tub Spout and Connecting the PEX
For the tub spout, I’m using a copper rough-in stub, which is a piece of pipe with an elbow bend. I’ll eventually be mounting a Delta adapter to the stub; this is what the tub spout will ultimately screw onto.
NOTE: I used half-inch PEX for the tub-spout drop but it might have been better to use three-quarters, which would have resulted in less restriction in water flow. Ideally, you would use copper for the whole drop, but since I didn’t want to deal with soldering, I installed PEX from the valve to the spout. The ideal solution here is to just get the Delta R10000 mixing valve with the PEX adapters and tub-spout drop already integrated.
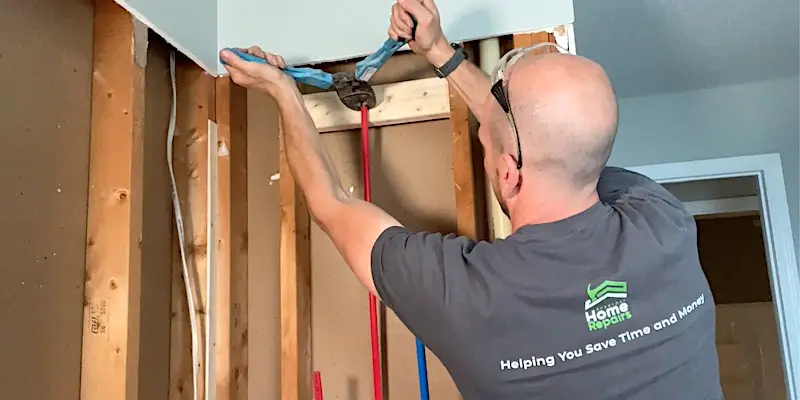
To begin, I’ll need to cut the PEX feeding the tub spout. I’ll hold up the stub to the PEX to get that measurement; then I’ll mark it.
After cutting the PEX, I’ll crimp on the stub for the tub spout and check it with my go/no-go gauge.
Now to secure the tub-spout rough-in to the support block. I used five screws for this. Bulletproof!
The last step in getting the plumbing roughed in is to connect the incoming hot and cold lines to the mixing valve. This is a simple matter of cutting the PEX and crimping-on a 90-degree angle. I find it easier to start with the shorter, horizontal piece and get the angle connector inserted into it first. The vertical piece, being longer, is a bit more forgiving.
How to Install PEX Water Lines and a Mixing Valve: Conclusion
There are quite a lot of steps involved in replacing copper water lines with PEX and installing a mixing valve but it isn’t terribly difficult. With some patience, care, and the right tools, it is an approachable DIY project that will save you oodles of money.
Related Tutorials
- How to install a Delta Custom 400 Series tub and surround (written tutorial with video links)
- How to install a Delta tub spout (video)
For the Full Bathroom Remodel
The entire bathroom renovation from demolition to towel bar installation is available on YouTube.
To Leave Comments and Questions
If something doesn’t make sense or if your situation is a little different, please leave a comment under the YouTube video. I check the comments on a daily basis and am happy to help out.
Don’t forget to subscribe to our channel as we have weekly videos coming out to help you with your everyday home repairs.
We’ll catch you on the next one! Take care.


