
 My Account
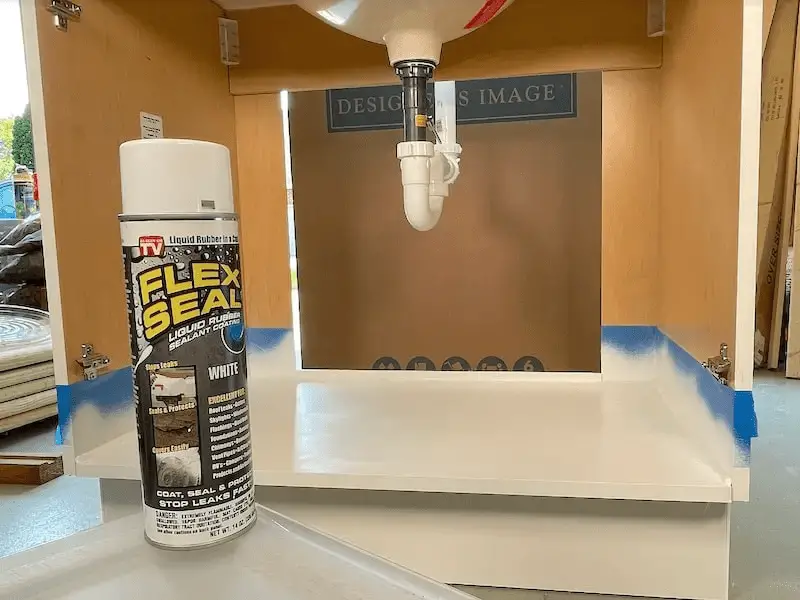
Today’s DIY project is how to use liquid rubber in a can — also known as Flex Seal — on the base of a bathroom vanity or kitchen cabinet to create a waterproof pan.
This project grew out of a previous tutorial where I demonstrated how you can protect a sink base with some peel-and-stick vinyl tiles.
The feedback I received on that tutorial was the genesis of today’s waterproofing project. Some viewers suggested using Flex Seal, which I had never used before. It sounded pretty interesting so I decided to give it a shot.
Waterproofing the bottom of your kitchen or bathroom cabinetry is an easy and wise thing to do that doesn’t cost much but can save you a bundle if you have a leak under your sink someday. A leak that goes unnoticed can cause water damage to your cabinet or even the subfloor, which can add up to big dollars in repairs and a lot of hassle.
This simple waterproofing technique is a great preemptive measure any DIYer can confidently undertake, even if you’re totally new to do-it-yourself projects. Best of all, it doesn’t take a lot of time or cost much.
How to Waterproof a Cabinet Base with Flex Seal: Step-by-Step Guide
In this step-by-step guide, we’ll first go over the prep work needed to get your bathroom vanity or kitchen cabinet ready for the application of the Flex Seal spray-on rubber.
Then I’ll show you how to spray on the liquid rubber, along with a few tips for a mess-free application.
Finally, I’ll share the results of the testing that I did, where I simulated a real under-the-sink leak to see how waterproof the Flex Seal was, and compare this approach to a similar project where I waterproofed a cabinet base with peel-and-stick tiles.
Rather watch than read? Check out this 10-minute video.
DISCLAIMER: This video and description contain affiliate links, which means that if you click on one of the product links, I’ll receive a small commission.
How to Waterproof a Cabinet Base with Flex Seal: Supplies, Tools, and Costs
Supplies
- Flex Seal (14 oz can)
- Painter’s tape
Tools
- Utility knife
Costs
A 14-oz can of Flex Seal costs about $12-$15.
How to Waterproof a Cabinet Base with Flex Seal: Prep
Taping
Because I want to end up with a rubber tray of Flex Seal and not just coat the bottom of the sink base with it, I’ll need to create a little lip all the way around. In other words, I’ll be applying the Flex Seal three-quarters of an inch up the sides of the cabinet.
The first step of the prep is to tape off the area to be coated with Flex Seal. This will vary according to how your bathroom vanity or kitchen cupboard is configured. I used two rows of 2-inch wide painter’s tape to protect against overspray.
TIP: A trick here is to use a roll of electrical tape laid on its side as a guide to mark the positioning of the painter’s tape. It’s way faster than using a measuring tape in this kind of environment.
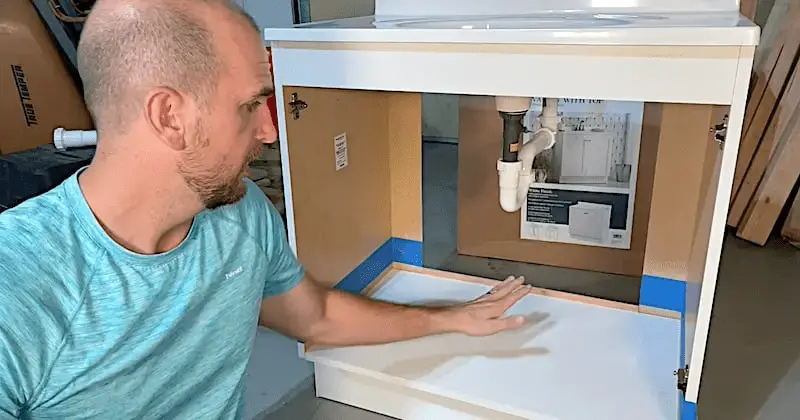
Cabinets with a Back
If your cabinet has a back to it, the taping is simple. Just mark off the desired height of the rubber pan you want to create (I went up the sides of the vanity three-quarters of an inch) and lay down a couple of rows of painter’s tape, wide enough to catch any overspray.
Cabinets without a Back
If your cabinet doesn’t have a back, like the vanity I’m using in this demo, you’ll need to add a strip of wood to the open area.
I applied a piece of lath for this. It’s quite thin; only 3/16 of an inch thick. I cut it to size and nailed it to the back of the vanity so that the top edge of it sits ¾ of an inch above the bottom surface. You could, of course, modify this for whatever height lip you wanted to create.

Your cabinet is likely against the wall already. In this case, you can just press a thin piece of wood between the open back of the cabinet and the wall, securing it with some liquid nails, to give yourself a surface for the application of the Flex Seal.
Caulking
The second step in the prep is putting a nice bead of tub and tile caulk around the perimeter of the cabinet base.
In my situation, the water lines and drain pipe are on the back wall.
If you have tubes coming through the bottom of the cabinet, you’ll want to also put a healthy bead of caulk around those openings to create a lip.
After applying the caulk, let it set for a few hours before applying the Flex Seal.
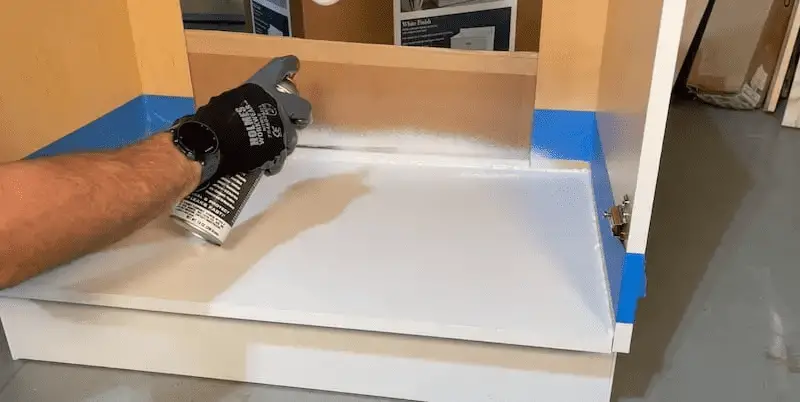
How to Waterproof a Cabinet Base with Flex Seal: Applying the Flex Seal
I’ll be applying two coats of Flex Seal to the base of my cabinet.
IMPORTANT NOTES: You need at least 24 hours of drying time for each coat of Flex Seal. When applying the product, ensure that the space is well-ventilated.
Tips for a smooth and mess-free application:
- Before applying the Flex Seal, shake the can well.
- Do some test sprays on a piece of cardboard before applying the Flex Seal to your cabinet.
- Use a piece of cardboard where necessary (such as an open vanity back) to catch any overspray
- Wear protective gloves.
- Spray from a distance of 8-10 inches.
- Work in fairly narrow sections. This makes it easier to keep track of where the Flex Seal has been applied.
- Give some extra attention to the vertical sections (the lip of the “pan” you’re creating). Gravity will work against you here so you might need to go back over these areas again to ensure full coverage and a watertight finished product.
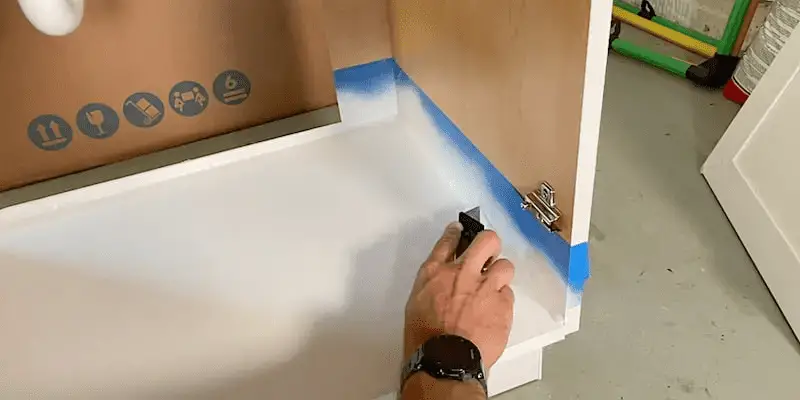
Once the Flex Seal is fully cured, score the bottom edge of the painter’s tape with a utility knife before pulling it off.
How to Waterproof a Cabinet Base with Flex Seal: Creating a Slope
My objective with this project is not only to create a waterproof pan around the base of my cabinet but also to have the water from any leaks come out the front of the cabinet so that I’ll notice it. Creating a waterproof barrier in the sink base is certainly going to prevent a lot of damage but ultimately I want to be aware that I have a problem!
All we need is a slight grade to make water flow in the direction we want, so I’m going to shim the back side of this vanity a wee bit to create a minimal slope.
How to Waterproof a Cabinet Base with Flex Seal: Conclusion
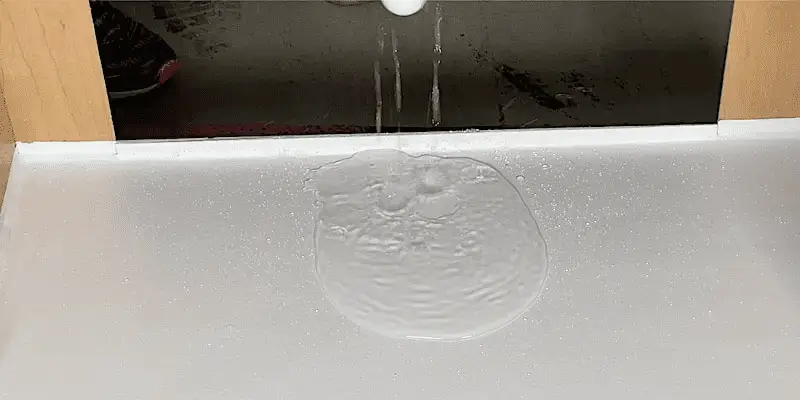
I did test out the Flex Seal by simulating a real water leak, and I was happy with the results. The water beaded up nicely on the surface and didn’t leak through the seams where the base of the cabinet meets the side walls.
To quickly compare Flex Seal with the peel-and-stick-tiles method that I used in my first tutorial:
- The peel-and-stick tiles project can be completed in about a half hour. With Flex Seal, you have to allow a couple of days for drying time.
- Both projects are economical. Flex Seal costs about $12 for a 14-ounce can, about twice what I spent for peel-and-stick tiles from the discount rack. I could have easily gotten another application out of the can of Flex Seal, however.
If you have a cabinet where the base is in bad shape, Flex Seal could be a good way to also freshen up the look.
Related Projects and Repairs
- How to Waterproof Cabinets (with peel-and-stick tiles)
- How to Realign Cabinet Doors
- How to Replace a Kitchen Sink Strainer
To Leave Comments and Questions
Please feel free to leave comments and questions under the YouTube video. I check the comments on a daily basis and am happy to help out.
Don’t forget to subscribe to our channel! We have weekly videos coming out to help you with your everyday home repairs.
We’ll catch you on the next one! Take care.


