
 My Account
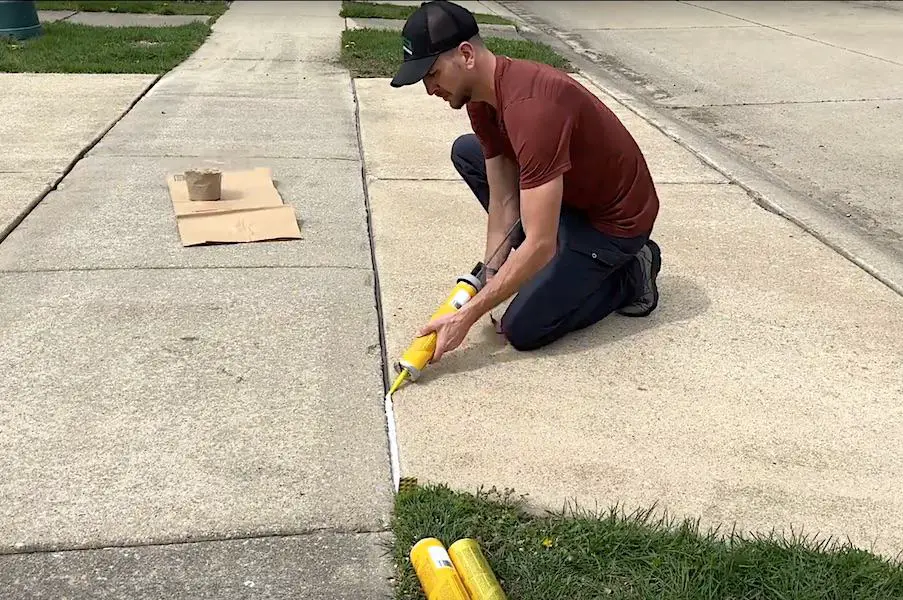
Want to get rid of grass and weeds that come up through the cracks in driveways and sidewalks? Today I’m sharing two simple do-it-yourself options that will make quick work of this annoying and frequent maintenance item.
Get Rid of Weeds in the Cracks of Driveways and Sidewalks: Step-by-Step Guide
In this step-by-step guide, I’ll be covering a temporary and a permanent solution to the problem of weeds and grass growing in the cracks of driveways and sidewalks. The temporary solution should set you for a season. With just a bit more work, the permanent solution will fix the problem for years to come.
Our example for this demo is the entrance to my driveway. My scenario is a pretty classic example of this problem. There’s grass growing in the expansion joints between the concrete slabs.
In this tutorial, I’ll go over the prep work needed, which is the same for both the temporary and the permanent solutions. As with most projects, the success of the final product is in the prep work! The prep for these solutions can be rather labor-intensive but isn’t complicated.
After showing the prep, I’ll go over the simple procedures to solve the problem of weeds coming up through the cracks in driveways and sidewalks both temporarily and permanently.
This is a DIY project anyone can undertake with a little patience and care.
Rather watch than read? Check out this 8-minute video.
DISCLAIMER: This video and description contain affiliate links, which means that if you click on one of the product links, I’ll receive a small commission.
Get Rid of Weeds in the Cracks of Driveways and Sidewalks: Supplies & Tools
Supplies
- Preen Weed Preventer
- Sika Self-Leveling Sealant
- Tremco Vulkem 45SSL Sealant
- ⅝-Inch Backer Rod
- ¾-Inch Backer Rod
- Sand
Tools
- A sturdy, flathead screwdriver or similar object
- A garden hose or power washer
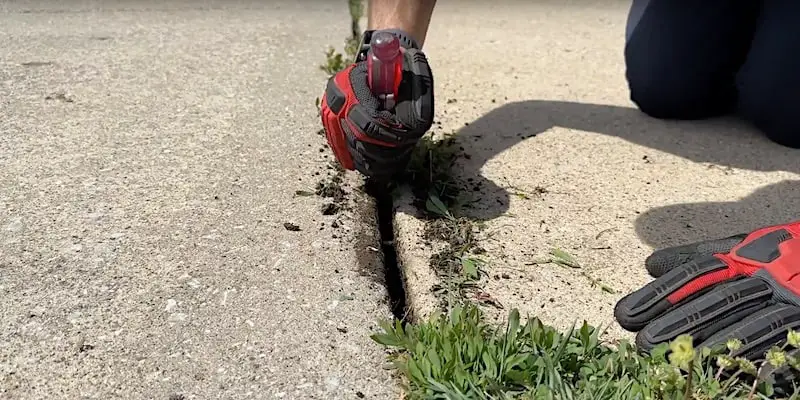
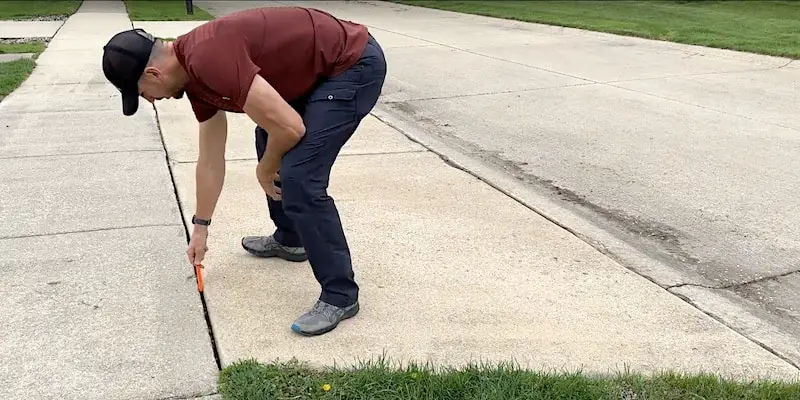
Prep Step 1: Dig Grass and Weeds Out of the Cracks
The first step in both the temporary and permanent solutions is to dig the grass and weeds out of the cracks.
I find a sturdy flathead screwdriver works really well for this. Dig down and get all the roots out plus as much of the dirt as you can. This step is pretty labor-intensive but necessary.
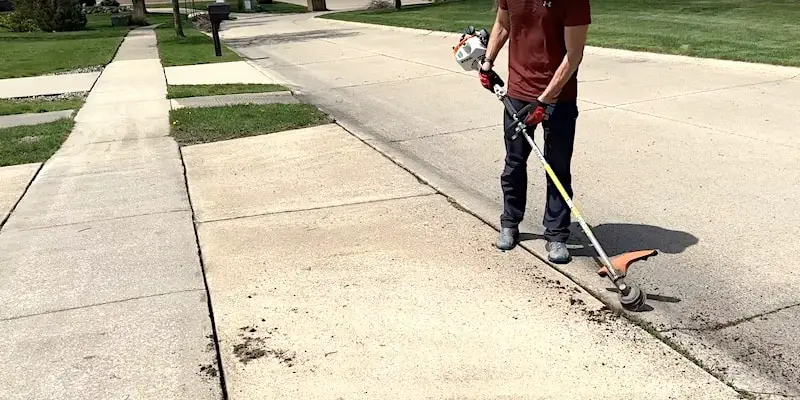
A string trimmer is also handy for removing dirt and vegetation. By turning it on an angle, the line gets inside the space between the concrete slabs and is pretty effective at clearing out lodged material.
After having done this work, you’ll probably still have quite a bit of soil in the cracks. If you think about it, this space filled with dirt is like a mini planter box, perfect for vegetation. So we want to get the soil out of there.
Prep Step 2: Flush Soil Out of the Cracks
Getting the soil out of the gaps in your sidewalk or driveway is pretty easy.
Take your garden hose and work your way down the crack or expansion joint, shooting the stream at very close range so that the dirt gets lifted up and out. You want to clear out a good couple of inches below the surface of the concrete.
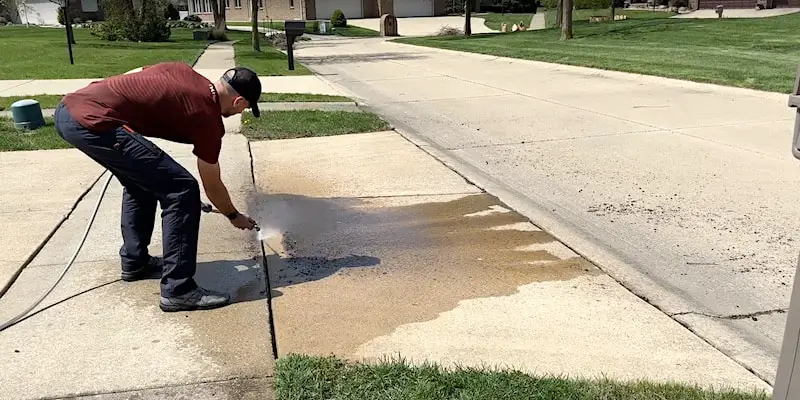
Start from the high side of your surface and work your way down to the low side, washing away the removed dirt with the hose.
Take your time and let the water do the work but do be careful. As the high-pressure water encounters impacted soil, it can blow back at you and get you wet and muddy.
With the soil removed from the cracks, let everything dry before proceeding.
Get Rid of Weeds in the Cracks of Driveways and Sidewalks: Temporary Solution
This temporary solution to weeds in the cracks of driveways and sidewalks should last about six months.
To accomplish this, I’m going to sprinkle some Preen into the crack that I have already cleaned out. Preen is a weed preventer.
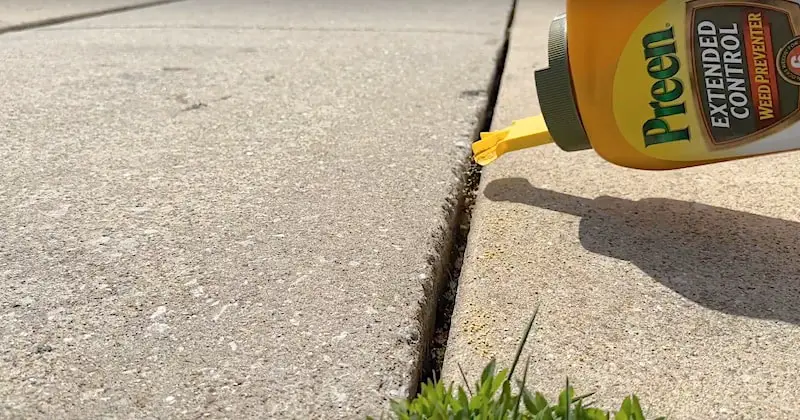
Alternatively, if you prefer not to use harsh chemicals, you could pour some rock salt into the gaps to deter the growth of vegetation. (Thanks to our viewers for this idea. Be sure to check out the comments under the YouTube video for more ideas.)
This solution is temporary because dirt will be deposited into the cracks when it rains. As new material builds up in the spaces, the weeds will return.
Get Rid of Weeds in the Cracks of Driveways and Sidewalks: Permanent Solution
The permanent solution to weeds and grass growing in the cracks of driveways and sidewalks is to fill and seal the cracks and joints. If we can keep soil, water, and light from getting into the gaps, our problem will be solved for good.
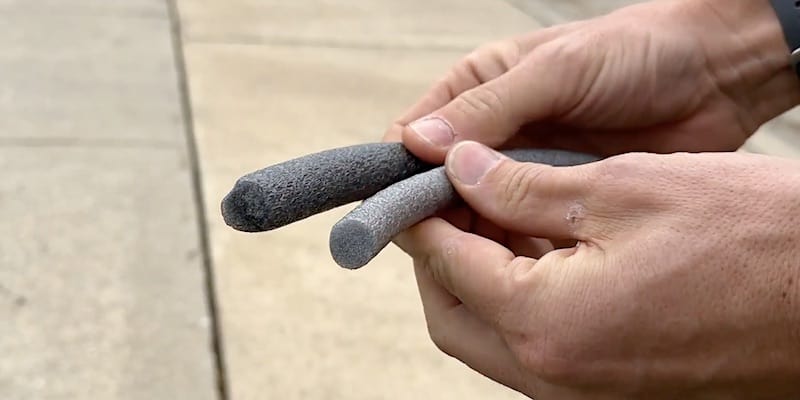
Measuring the Gap and Choosing Backer Rod (Filler)
To begin, we need to know the width of the gap so that we know what size backer rod to get. I like to use a carpenter’s pencil for this. All I do is run the pencil through the crack.
Because a carpenter’s pencil is ½-inch by ¼-inch in size, I can easily eyeball the width of the gap as I pass the pencil down through the space.
The expansion joints in my driveway are about a ½-inch wide. I’ll want my backer rod — which is the material that will fill the major part of the gap — to be a bit bigger than this because it needs to fit tightly in the space. It’s a good idea to have two sizes, as the size of gaps tends to vary. In my case, where the gap is averaging ½-inch in width, I’m using ⅝-inch and ¾-inch diameter backer rod.
Using Backer Rod to Fill the Gaps
I’ll first press the backer rod into the gap with my fingers, using enough pressure to just get it seated in the expansion joint. Then I’ll use my carpenter’s pencil laid on its wide side to work the backer rod further in by pressing down on the pencil with my fingers.
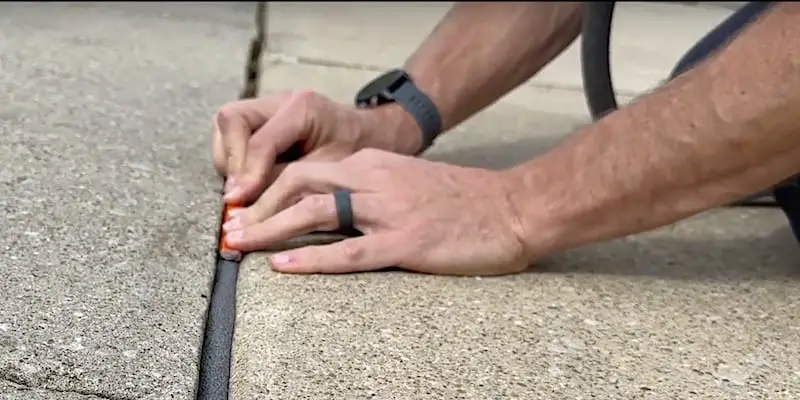
I want the backer rod to end up about ¼-inch below the surface of the concrete, so the carpenter’s pencil, being ¼-inch wide on the short side, is a perfect reference for this.
A FEW THINGS TO NOTE ABOUT BACKER ROD:
It’s important for the backer rod to fit tightly in the gap. If it’s not crammed in there, it can float up when you apply the sealant, which will result in an unattractive finish. The trick is to work in sections. When you find that the backer rod is no longer fitting tightly in the gap, stop and leave a space that you’ll come back to. On the next pass, fill these wider sections with a larger-diameter backer rod. Take care also not to leave any spaces between the sections of backer rod.
If the gap you need to fill is an irregular shape or wider than an inch, you could use a pool noodle to create a custom filler. A pool noodle is essentially a monster backer rod and works brilliantly for this sort of repair.
Once I’ve filled all the gaps with backer rod, I’m ready to apply my sealant.
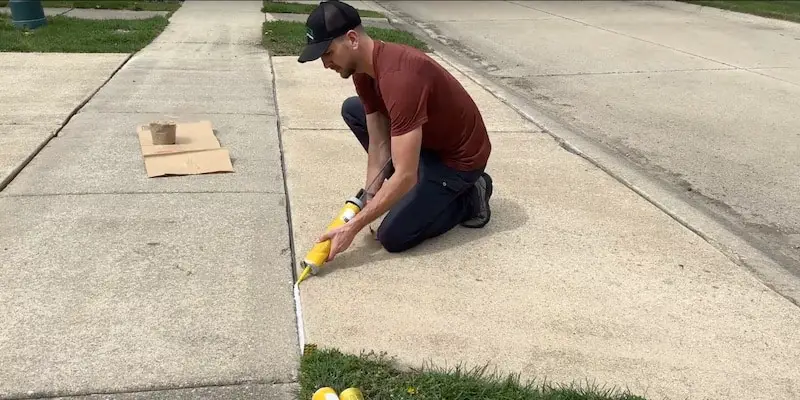
Applying Sealant to the Gap
There are two different sealants I like to use for projects like this:
- Sika Self-Leveling Sealant. This is a premium-grade polyurethane product that cures quickly. It’s great when you have a completely level surface. I’ve repaired a number of cracks using Sika Self-Leveling Sealant and it’s held up well for a number of years. I’m going to use it on the expansion joints of my driveway that run parallel to the sidewalk.
- Tremco Vulkem 45SSL. This is a polyurethane sealant specifically formulated for this type of application. It works well on surfaces with up to a 6% grade, so I’m going to use it on the expansion joint in the middle of the section of the driveway that slopes down to the street from the sidewalk.
The issue with using two different kinds of sealant is that they’re two different colors. There’s an easy trick to remedy this: sand. By sprinkling some sand on the fresh sealant, I create a more unified color.

Normally, I would wait 30-45 minutes before sprinkling on the sand. If you happen to be doing this on a windy day (as I was doing in the demo), it would be better to apply the sand immediately to prohibit debris from getting into the sealant.
I’ve also noticed that applying this type of sealant in direct sunlight when it’s hot (80 degrees F or higher) can cause the product to bubble.
TIPS FOR APPLYING SEALANT:
Take your time when applying the sealant. It is self-leveling so the application doesn’t have to be perfect but you want the quantity to be right. Holding the tube at an angle and leaning the tip on the concrete will help you get a more even application.
Get Rid of Weeds in the Cracks of Driveways and Sidewalks: Conclusion
Getting rid of weeds in the cracks of driveways and sidewalks is not a complicated DIY project. It doesn’t require any special skills or tools, and the supplies are not costly.
It’s best to tackle this project on a calm day that’s not too hot. This is a repair that any do-it-yourselfer of any level of experience can take on with confidence.
Related Project: How to Fix Irregular or Wide Cracks in a Sideway or Driveway
Check out our video on how to use a pool noodle to fill a crack in your sideway or driveway that’s an irregular shape or wider than an inch.
To Leave Comments and Questions
If something doesn’t make sense or if your situation is a little different, please leave a comment under the YouTube video. I check the comments daily and am happy to help out. Feel free to leave your ideas as well. There are lots of ideas from viewers under this particular video.
Subscribe to our YouTube channel for weekly videos to help you with your DIY repairs and projects around the house.
Thanks for stopping by!


