Hi, I'm replacing a burst (was frost-free, but I left the hose connected) outdoor faucet with a new frost-free. Interior piping is CPVC.
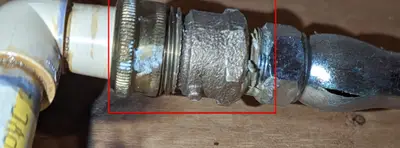
Old connection was with a CPVC to FHT (female hose thread) union on the house side, and a MPT to MHT (male hose thread) adapter on the faucet side. The connection is 'accessible' but in the basement, I feel like this type of connection maybe isn't appropriate to just depend on the rubber washer to maintain a seal indefinitely?
So I'm planning to use threaded connections (not SharkBite), with a CPVC to stainless FPT adapter to connect the house piping directly to the NPT on the new faucet, with thread sealant. (Due to the short length of CPVC remaining (see pic) I assume I'll have to cut out the elbow and replace with new so I can attach the adapter.)
Does this plan make sense? I am assuming electrolysis between dissimilar metals (SS and copper or brass) should not be an issue since nothing here is grounded, is that correct? Or is anything else wrong with this plan?
I am also concerned about stressing the CPVC when I screw in the faucet, any tips on getting them 'mostly aligned' so I don't have to stress the existing piping? I was thinking of making alignment marks on the new adapter vs. faucet after doing a dry test-fit prior to installation, but I'm not sure how many extra degrees of turn beyond 'feeling snug' I will get once the tape and sealant is applied for the final install.
Thank you!
Yeah, here are the 2 different paths that come to mind
1) Cut the CPVC before the elbow and then rebuild with CPVC ending with a CPVC to NPT adapter then thread that into a frost-free spigot with NPT.
2) Cut the CPVC before the elbow and then use an adapter to PEX. Purchase a frost-free spigot with a PEX end and depending on the radius you might be able to just make the 90-degree angle by bending the PEX or could use a PEX elbow if needed.
Thanks Scott!
Hi again folks. I was able to get this done. Wanted to come back and share some comments.
Initially I was going to go with CPVC and save a few bucks since I already had the tools and materials for the most part. But the piping is old and I was really worried about stressing things and causing another leak elsewhere. Also, and maybe more importantly, there are some other plumbing tasks I'd like to take on in the near future.
I didn't really know much about PEX until Scott mentioned it above, so I started looking into it. PEX-A seemed very attractive due to the flow rate, but of course it's a heavy up-front cost to get a powered expander. I didn't really think I had enough room to work in that small 'boxed-in' area for a manual expander, and maybe not even a manual crimper for PEX-B. So I ended up buying a 100ft roll of PEX-A tubing (which should leave me plenty for other projects) and the M12 Fuel expander.
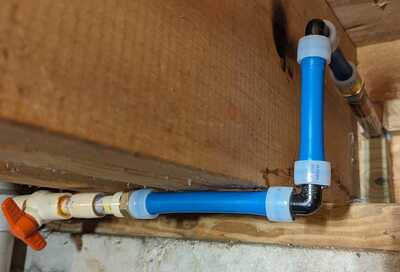
I unfortunately wasn't able to get a good bend without kinking so I ended up just falling back on using elbows. I'll include a pic of the finished product below.
A few things that come to mind, now that this is done:
- Scott, I'm really glad you brought up the PEX idea; thanks. It's SO much easier to work with.
- While I'm glad I went with PEX-A, one thing that became apparent is that you aren't really able to 'dry-fit' things like you can with CPVC, and I'd imagine copper and PEX-B. Sure, technically you could expand fittings, assemble, then cut and re-do; but that's a lot of hassle. So that's definitely a place where PEX-B would shine I think. Also, this made measurements and doing plenty of hand-held "mock-ups" all that much more critical.
- Aside from having to take many many careful measurements, I found the following noteworthy about working with PEX-A:
- The expansion sleeves are a very tight fit over the end of the pipe; so the first one I did, I'm pretty sure I did not have it pressed on all the way (maybe 1mm gap). It's not leaking but I will have to keep an eye on it for a while.
- Due to the above, when I had an already-installed fitting that I needed to press a sleeve onto, I had to be careful not to transmit that force back into the pipes and end up breaking something elsewhere in the line.
- They didn't seem to have sillcocks with either flavor of PEX at the local HD, so I got one with NPT and then used a threaded adapter to PEX.
- The tool was $380, so not cheap at all. But I figure I'm still ahead of the game since I didn't have to call a plumber, which probably would have cost at least that much; and now I've got new tools, supplies, and skills for the future.
Anyway, I just turned the water on about 30 mins ago and I'm not seeing any leaks, but I'll check it again in the morning. This spigot burst probably about 5 years ago and I never had the time and know-how to do it; so these are exciting times. We'll finally be able to do power washing, car washes, and summertime sprinklers with the kids again. Scott's YT videos helped make this a manageable DIY project.
Thanks. And as promised, here's a pic of the finished product (minus a talon into the floor joist, which I will install tomorrow after double-checking for leaks).
You might see a couple of wood blocks in there, I glued those against the floor frame in the back to hold them against the pipe to help brace it from movement in case it gets cranked from the outside. Also, the top one is covering another 'misplaced' hole which was there from previous owners, so it's sealing off a draft as well.
Me again. Unfortunately I have to post what may be something of a negative outcome from the work above.
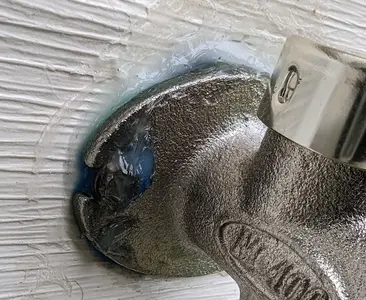
When I sealed off the 'extra' hole, as well as the sillcock flange against the vinyl siding, I used a bunch of DAP Dynaflex 230 which is a 'silicone-like' (but latex-based) sealant. I used this because it looked like it would have similar durability to silicone, but was a little cheaper.
The other day, from the outside, I noticed the curing sealant looked like it was turning blue.
After doing some research online it looks like Dynaflex 230 reacts with copper, which the sillcock pipe is made of.
The container says it's fine to use on "metal" and as best I can tell, has no warnings against using it on copper. Only after searching Home Depot reviews and Q&A did I find discussions about this; for the most part the manufacturer responses seem to warn against 'discoloration of the sealant.' For example, "Because copper and copper alloys (such as brass, bronze etc.) are considered reactive, they will likely result in undesirable discoloration of the sealant."
However there was a single response where they say the following: "When an unplanned chemical reaction occurs between materials, one or both of the materials undergoing that reaction may experience chemical/physical changes and/or damage. For this reason, DAP does not recommend the use of this product on copper or copper alloys."
While discoloration would be disappointing, I think I could live with it if that is the extent of the damage; but based on the last statement above I'm not sure if this will perforate the pipe over time, or compromise the sealant, and maybe I need to do half this job all over again; and possibly even buy a new sillcock.
Needless to say, it is extremely disappointing that there is no warning against this on the product container. Going to have to think this over for a bit and can update the topic again later, I figured it was an important warning for anyone else taking this on.


